Water on the floor is never just water on the floor. In a Toronto home, condo, office, or rental property, even a small leak can move behind baseboards, under flooring, into drywall, and through ceiling cavities faster than most people expect. The right water damage restoration steps are not about making the space look dry. They are about stopping structural damage, preventing mould growth, and getting the property back to a safe, usable condition.
When response is delayed, the damage changes quickly. Clean water from a burst supply line can turn into a much bigger problem once it sits, spreads, and pulls contaminants from building materials. A sewer backup or storm-related flood raises the stakes even further because sanitation and health risk become part of the job. That is why restoration has to follow a disciplined process, not guesswork.
Why water damage restoration steps need to happen fast
The first 24 to 48 hours matter most. Drywall absorbs water, wood swells, laminate flooring buckles, insulation traps moisture, and hidden damp areas create ideal conditions for mould. In commercial spaces, downtime can also mean interrupted operations, tenant complaints, and safety exposure.
Fast action does not mean cutting corners. It means controlling the loss before it spreads. A proper response protects what can still be saved and identifies what must be removed. In many cases, speed lowers total repair cost because less material reaches the point of failure.
Step 1: Emergency assessment and safety control
The first step is always to assess the source, category, and extent of the water intrusion. Before extraction equipment comes in, the area has to be made safe. That can mean shutting off the water supply, isolating electrical hazards, checking for ceiling collapse risk, and restricting access to contaminated areas.
This stage also determines what type of water is involved. Clean water from a broken pipe is handled differently than grey water from an appliance overflow, and both are very different from black water tied to sewage or flood contamination. The category affects every decision that follows, from what can be cleaned to what must be removed.
For property owners, this is the point where acting fast helps the most. If the source is still active, every minute adds to the loss. If the water has already stopped, hidden migration is still a concern, especially in finished basements, wall cavities, and under hard-surface flooring.
Step 2: Water extraction and removal
Once the area is secured, standing water has to be removed as quickly as possible. This is where professional extraction makes a major difference. Shop vacs and household fans may remove some visible water, but they are not designed to deal with saturated subfloors, deep carpet padding, or large-scale intrusion.
Commercial extraction equipment pulls water out faster and more thoroughly. That matters because drying does not start properly until bulk water is gone. If standing water remains, moisture keeps moving sideways and downward into materials that may otherwise have been salvageable.
In some situations, removal also includes damaged contents. Wet rugs, furniture, boxes, inventory, and porous materials may need to be relocated or discarded depending on contamination level and saturation. The trade-off is straightforward – preserving contents is ideal, but not at the expense of drying delays or cross-contamination.
Step 3: Moisture mapping and damage inspection
Visible water only tells part of the story. One of the most important water damage restoration steps is moisture mapping – using professional meters and thermal imaging to find where water has travelled. This is how technicians identify damp drywall, wet framing, trapped ceiling moisture, and hidden floor saturation.
Without this step, a property can appear dry while moisture remains behind finished surfaces. That is when problems return weeks later as staining, warping, odours, or mould growth. Hidden moisture is one of the biggest reasons DIY cleanup often falls short.
This inspection also helps determine the scope of demolition, if any is needed. Not every wet material must be removed, but some do. It depends on the water category, how long the materials were exposed, and whether they can be dried in place without creating a health or structural issue.
Step 4: Controlled demolition when needed
Demolition sounds drastic, but in restoration it is often targeted and necessary. Water-damaged drywall, insulation, swollen particleboard, contaminated finishes, and trapped flooring assemblies may need to be opened up or removed so the structure can dry properly.
This is not about tearing out everything. It is about removing materials that cannot be safely restored or that are blocking airflow to wet structural components. In a clean-water loss caught early, the tear-out may be limited. In a sewage backup or long-standing leak, more aggressive removal is usually required.
Property owners often hope to avoid demolition entirely, and sometimes that is possible. But keeping saturated or contaminated materials in place can extend the drying timeline and create a much larger mould or odour issue later. A controlled approach saves more than a cosmetic one.
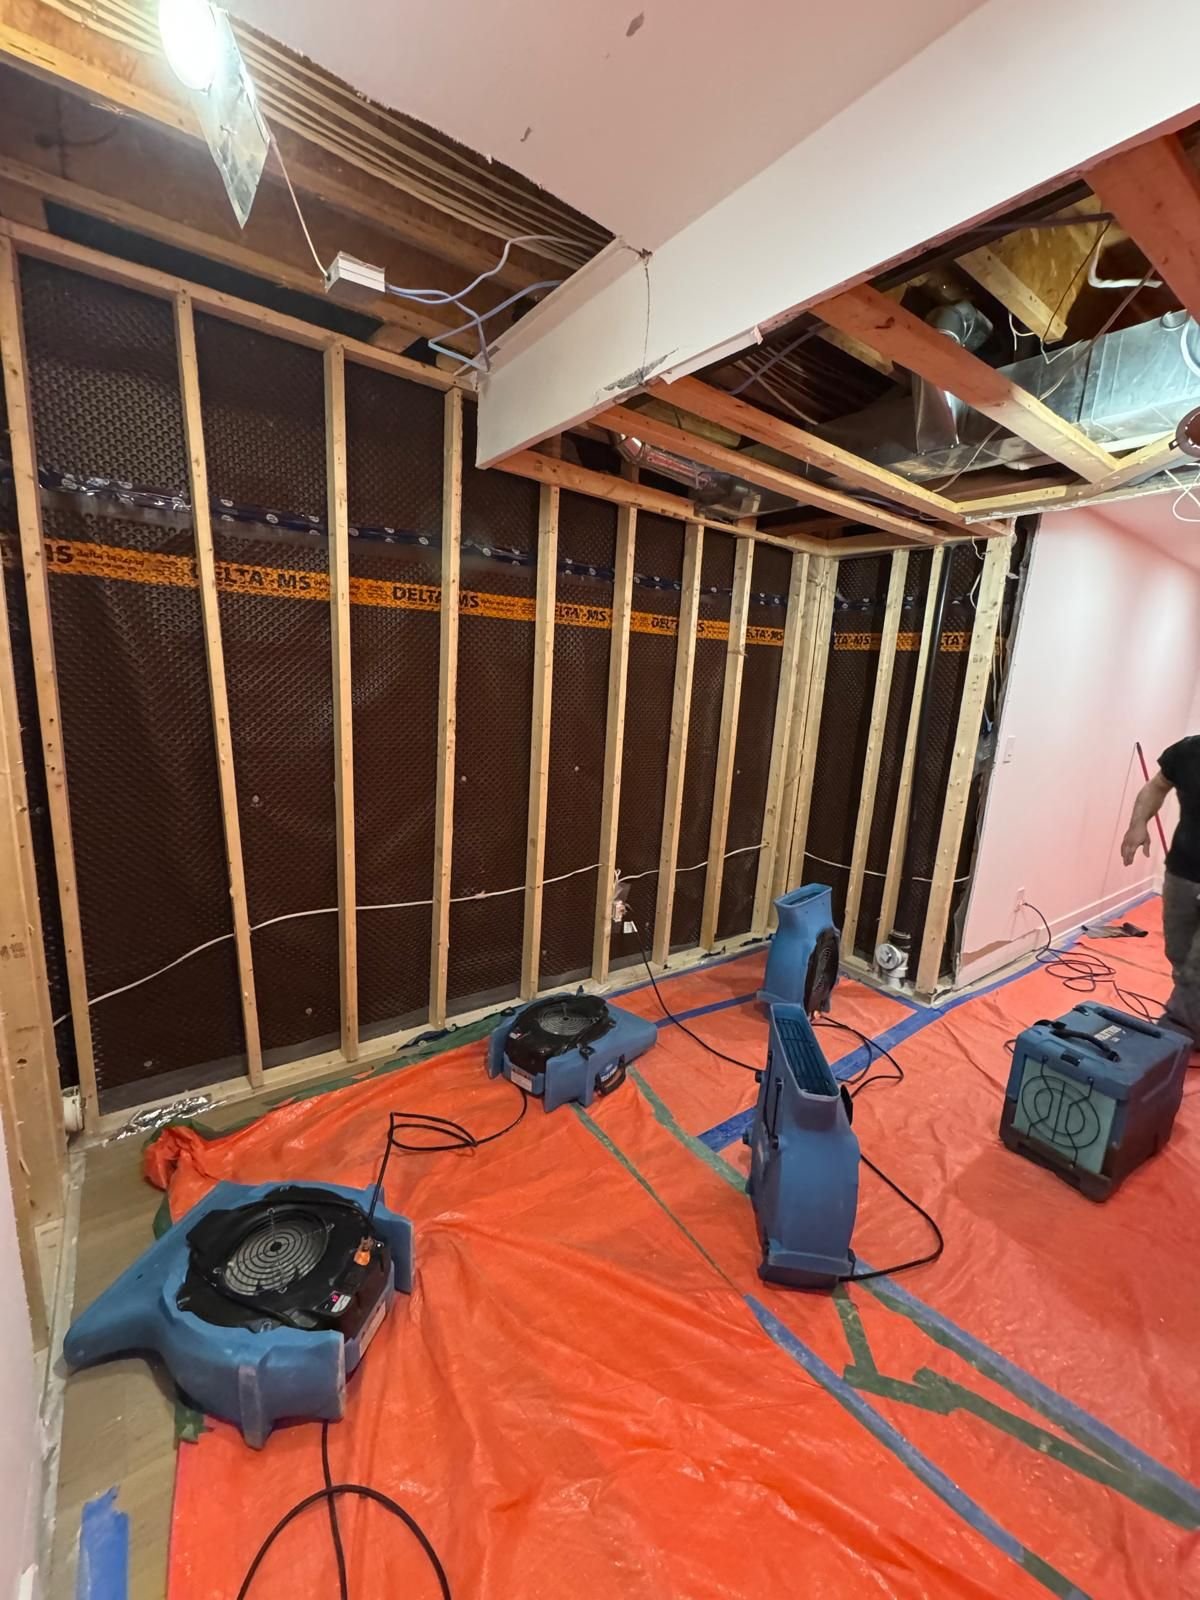
Step 5: Structural drying and dehumidification
After extraction and any required tear-out, the drying phase begins. This is where air movers, dehumidifiers, and specialized drying equipment are strategically placed to remove moisture from structural materials and the air itself. The setup is based on the size of the affected area, the materials involved, temperature, humidity, and how far the water has migrated.
Drying is not a matter of blasting fans for a day or two. Effective drying is monitored and adjusted. Moisture readings should trend downward at each visit. If a wall cavity is not drying as expected, the equipment layout or demolition scope may need to change.
This stage can take several days depending on the extent of the loss. Hardwood, plaster, dense framing, and layered assemblies often take longer than surface materials suggest. That is why patience matters here. Stopping too early may save a day now and cost far more in repairs later.
Step 6: Cleaning, sanitizing, and odour treatment
Once the property is dry or nearing dry standard, cleaning and sanitation become the focus. Water intrusion often leaves behind more than moisture. There can be soil, residue, bacteria, debris, and persistent odours, especially after basement flooding, drain backups, or stormwater events.
Affected surfaces and salvageable contents may need antimicrobial treatment, detailed cleaning, and deodorization. In contaminated water losses, sanitation is not optional. It is part of making the property safe again for occupants, tenants, staff, or customers.
Odour treatment depends on the source. A clean-water pipe break is different from sewage contamination or long-term dampness. If materials holding contamination are still present, odour treatment alone will not solve the issue. The source must be removed first. That is why professional restoration looks at cause, not just symptoms.
Step 7: Repairs and reconstruction
The final step is putting the property back together. Depending on the damage, that may include drywall replacement, insulation, flooring, trim, painting, ceiling repairs, or larger reconstruction work. For many owners and managers, this is where the real value of a full-service restoration provider shows up.
Coordinating mitigation with repairs under one team usually reduces delays and miscommunication. The people who handled extraction, drying, and remediation already understand the scope of the loss and the condition of the structure. That continuity helps the rebuild move faster and with fewer surprises.
For a condo owner, that may mean reopening a kitchen or bathroom quickly. Property managers often focus on reducing turnover delays and tenant disruption. In a commercial setting, the priority is protecting business continuity and getting people back into the space safely.
Common mistakes during water damage restoration steps
The biggest mistake is waiting. People often assume a small leak can be handled later if the visible mess is cleaned up. But hidden moisture does not wait. Another common error is using household equipment for a large or contaminated loss. Surface drying is not the same as restoration.
It is also risky to paint over staining, leave damp drywall in place, or reinstall flooring before moisture targets are met. Those shortcuts can hide a problem for a short time, but they rarely solve it. In sewage or flood situations, underestimating contamination is especially dangerous.
When professional help is the right call
Not every minor spill needs a full restoration crew. But if water has affected drywall, ceilings, insulation, flooring systems, finished basements, electrical areas, or more than one room, the safer move is a professional assessment. The same applies immediately for sewer backups, storm flooding, repeated leaks, and any sign of mould or musty odour.
For Toronto and GTA properties, rapid response matters because shared walls, lower-level units, and tightly finished interior spaces allow moisture to spread fast. An experienced team such as CPR24 Restoration brings the equipment, moisture tracking, sanitation protocols, and repair capacity needed to control the loss properly from day one.
The best closing thought is simple: when water enters a property, do not judge the damage by what you can see. The right response starts early, follows the correct process, and treats hidden moisture as seriously as the puddle on the floor.