Difference Between Mold Removal and Remediation
Learn the difference between mold removal and mold remediation, why it matters, and what proper cleanup should include to stop mold from returning.

Learn the difference between mold removal and mold remediation, why it matters, and what proper cleanup should include to stop mold from returning.
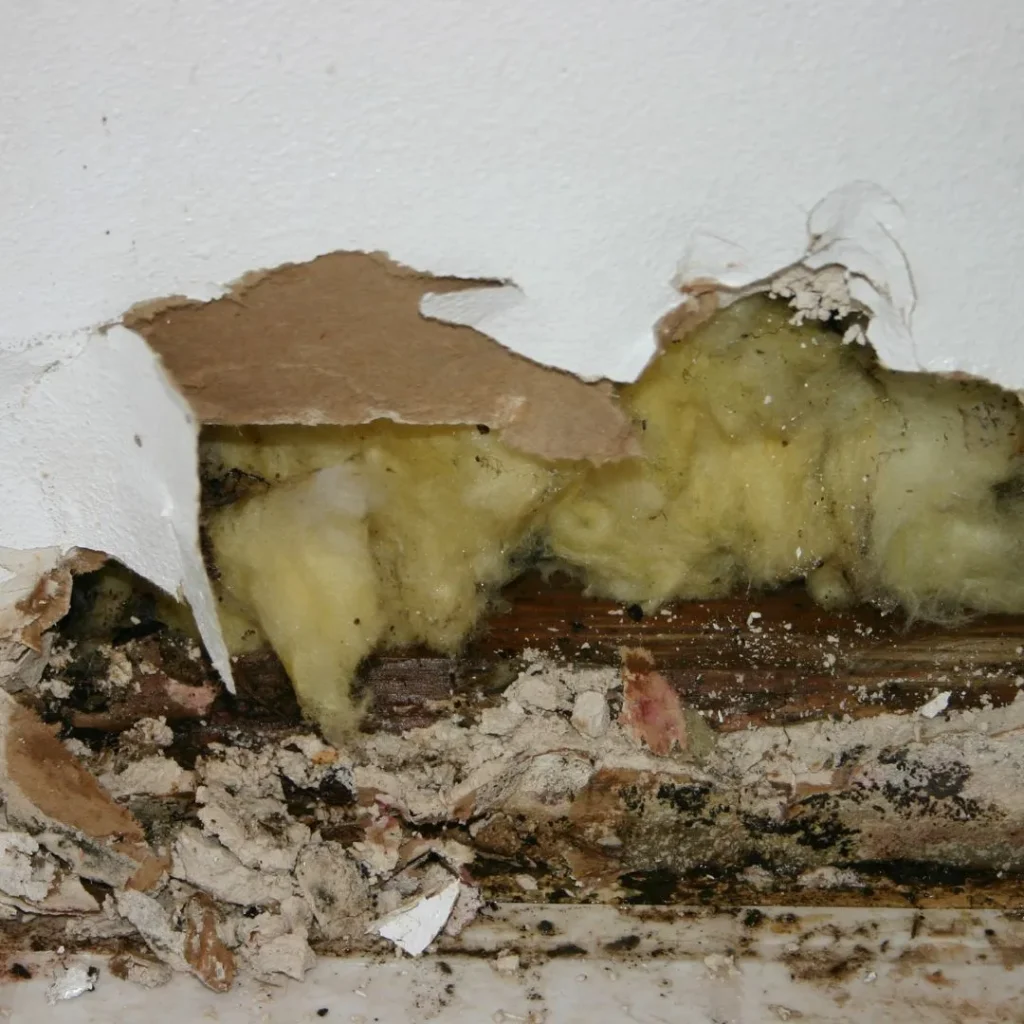
How does secondary water damage happen? Learn how hidden moisture spreads, weakens materials, triggers mold, and raises repair costs fast.
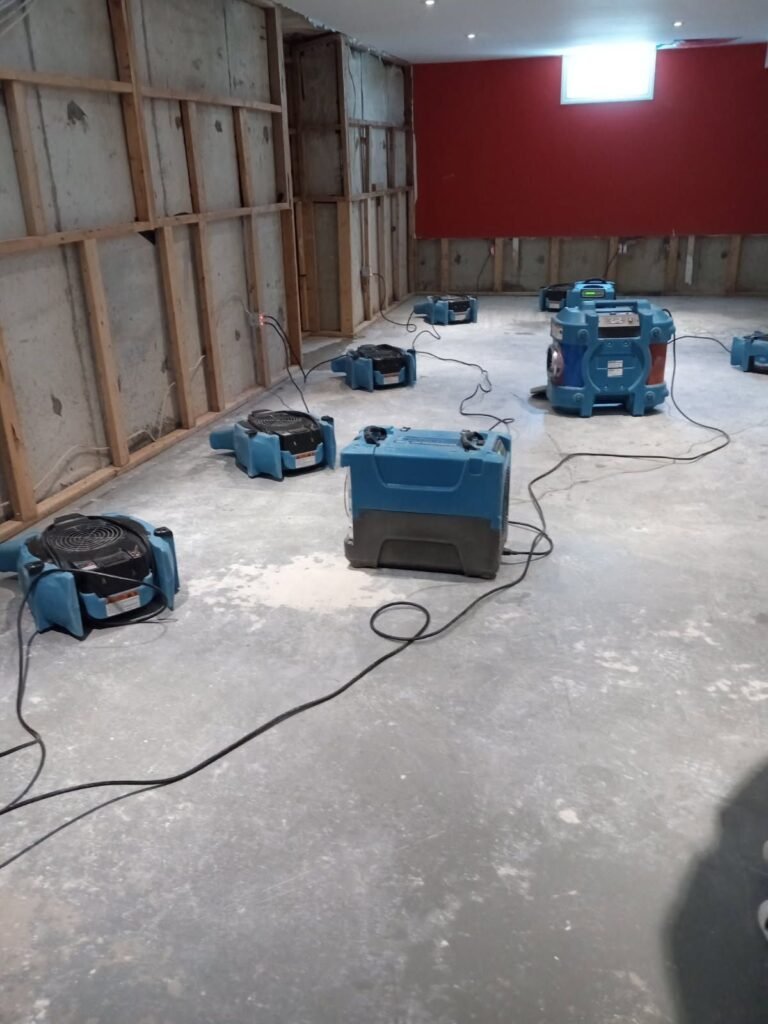
What is water damage restoration? Learn how fast cleanup, drying, sanitizing, and repairs protect Toronto properties from costly loss.
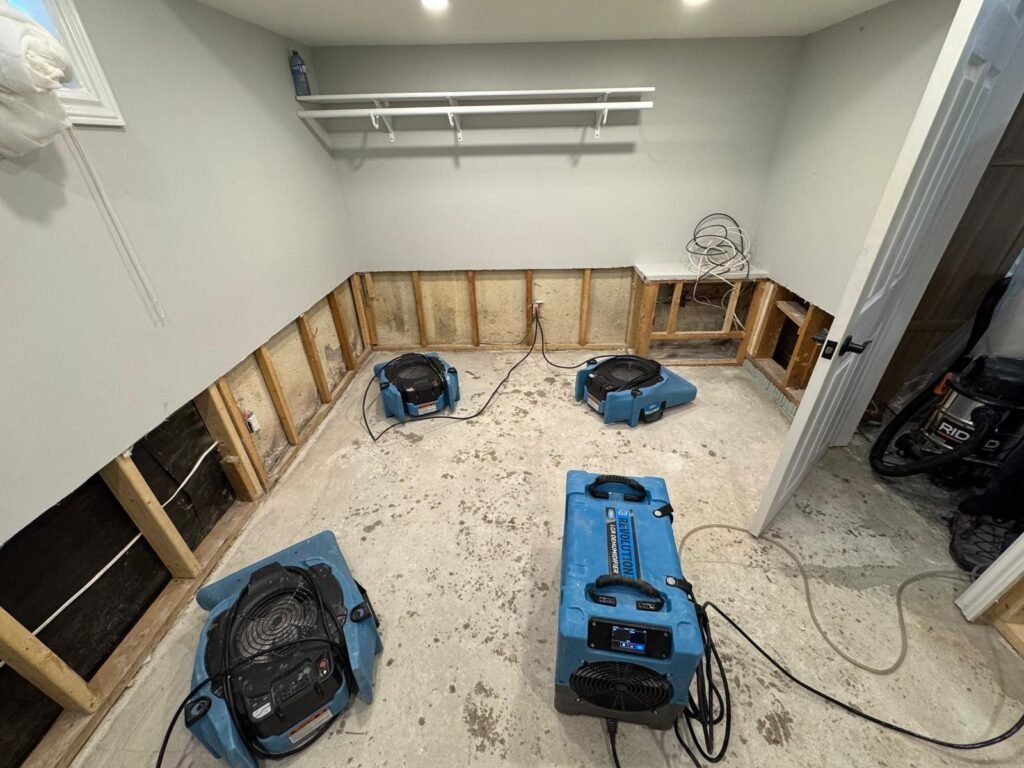
How long does water damage restoration take? Learn what affects timelines for drying, cleanup, repairs, and safe recovery after flooding.
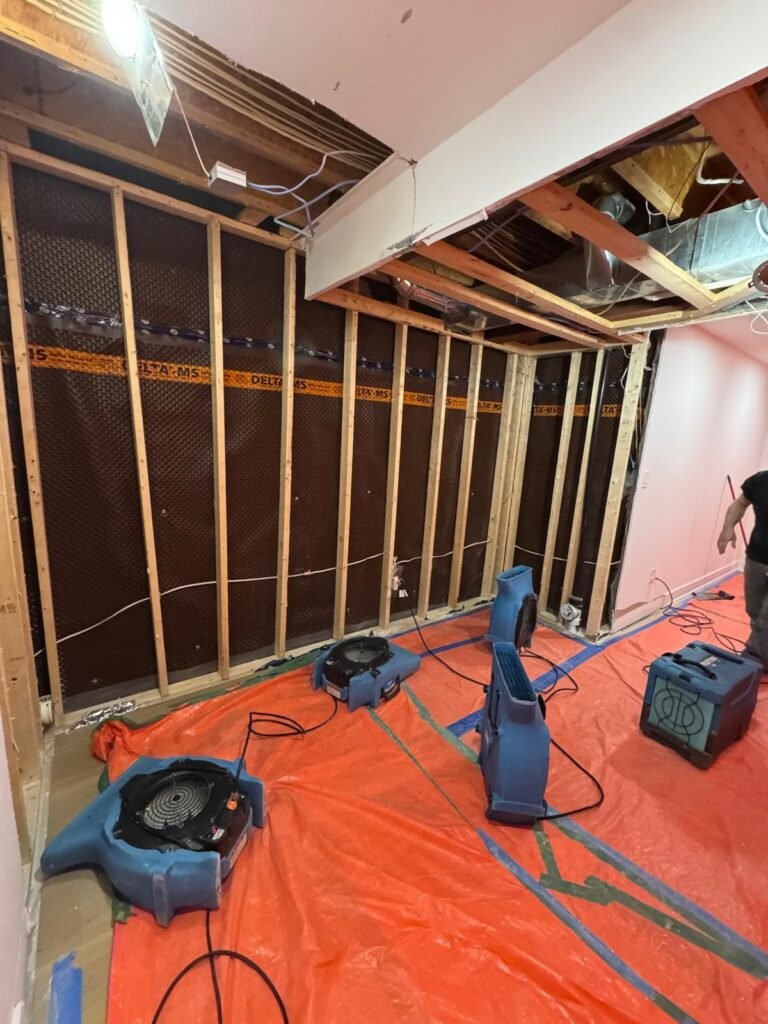
Learn the water damage restoration steps that protect your property, reduce repair costs, and stop mould, odours, and structural damage fast.
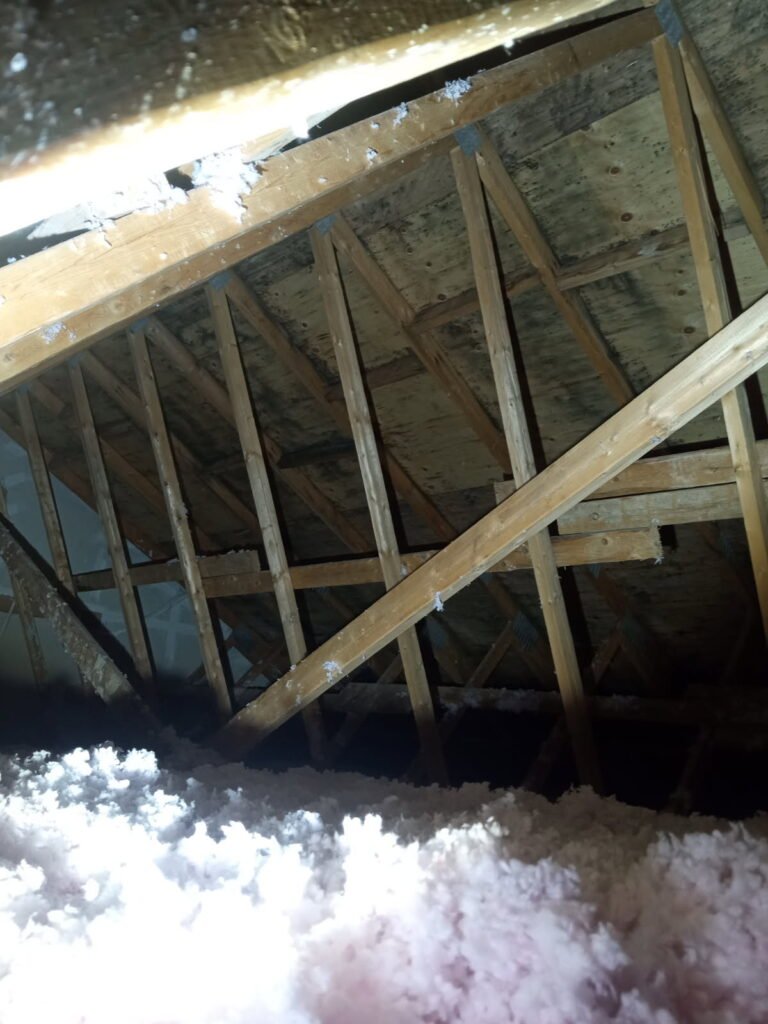
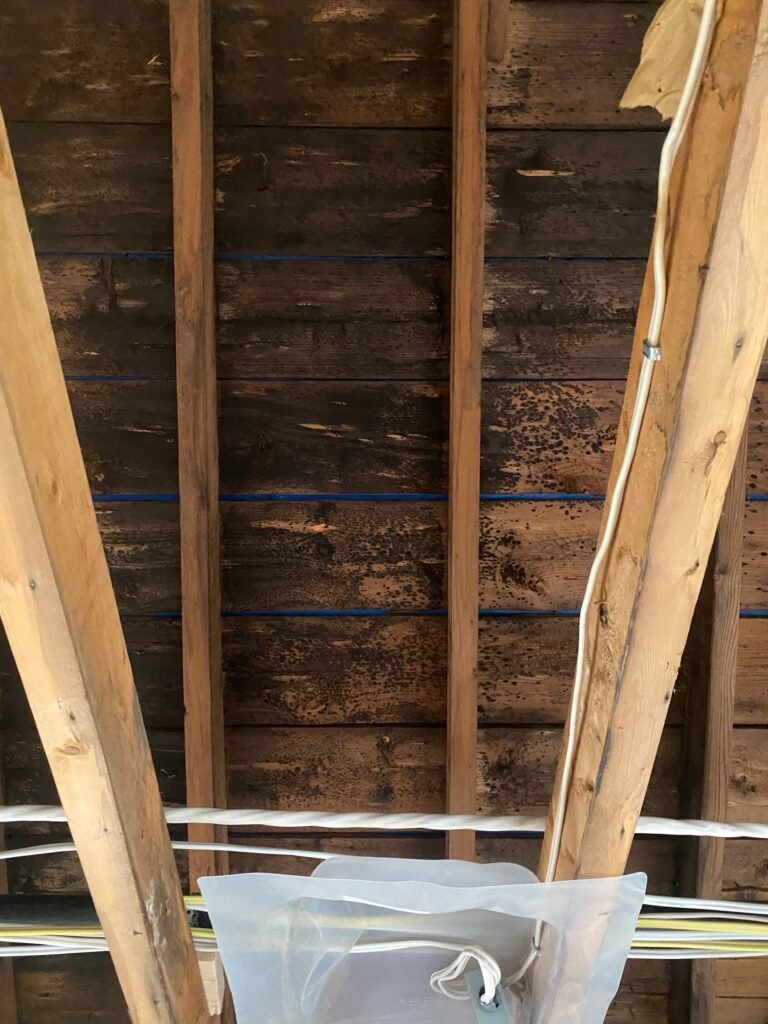
Exposure to mold spores increases the risk of respiratory issues by 25-30% in humid urban areas. This makes Mold Removal Rosedale Toronto a priority service for homeowners who want to protect their health and property. Toronto’s humid climate supports mold growth, especially in older areas like Rosedale. Historic homes there are more prone to moisture leaks, water damage, and poor airflow. At CPR24 Restoration, we provide comprehensive Mold Remediation Rosedale Toronto services designed to identify, contain, and eliminate mold at its source. As a certified mold removal company Toronto homeowners trust, our team inspects your home carefully. We use proven methods to remove mold. After removal, we check again to keep your indoor space safe. Whether you need residential mold removal in Rosedale or basement mold removal in Rosedale, Toronto, we can help. If water damage happens, our team can respond fast. Our specialists understand the unique challenges that Rosedale homeowners face. Our goal is to offer dependable Toronto mold removal and restoration services. We want to restore your property. We also want to help you feel at ease again. This guide explains why Rosedale homes need professional mold removal. It covers warning signs of mold and contamination. It also shows how CPR24 Restoration provides effective solutions. CPR24 Restoration is one of the trusted mold removal experts Toronto residents rely on. Why Rosedale Homes Need Professional Mold Removal Rosedale’s Historic Architecture and Mold Vulnerability Rosedale’s charm comes from buildings built before the 1950s. Many of these architectural treasures lack modern moisture management systems. Buildings constructed before the mid-20th century often lack vapor barriers, waterproof membranes, and proper drainage systems. As a result, professional mold inspections become essential to preserve these valuable properties. Historic homes throughout Rosedale face several structural vulnerabilities: These conditions make Professional Mold Removal Toronto services essential. Heritage properties require specialized remediation methods that remove contamination without damaging original materials. Climate Factors Contributing to Mold Growth Toronto’s weather patterns create ideal conditions for mold development. High summer humidity levels, frequent rainfall, and freeze-thaw cycles during winter all contribute to moisture accumulation. Mold growth typically occurs when indoor humidity exceeds 60%. During Toronto summers, humidity frequently surpasses this threshold. Condensation forms when warm, humid air comes into contact with cooler surfaces, especially in basements and poorly ventilated areas. Spring snowmelt, summer humidity, and heavy rainfall can all contribute to moisture problems that require professional intervention. This is why Mold Removal Rosedale Toronto remains an essential service for local homeowners. Why Homeowners Choose CPR24 Restoration When searching for the best mold removal company in Rosedale, homeowners need a restoration company with the right expertise. They should understand mold remediation and heritage construction. CPR24 Restoration is a top-rated mold removal toronto service in Toronto. We offer full inspections, advanced remediation, and long-term prevention. Our team provides: As Trusted Mold Removal Experts Toronto homeowners rely on, we find and fix moisture sources, not just visible mold. This approach helps prevent recurring contamination and protects your investment. Common Areas Where Mold Develops in Rosedale Homes Many projects involving Rosedale Toronto Mold Removal reveal hidden mold growth in areas that homeowners rarely inspect. Basement Mold Removal Rosedale Toronto Basements often have mold growth because of foundation leaks, groundwater seepage, and high humidity. Mold often develops behind finished walls, beneath flooring, and inside storage areas. Professional Basement Mold Removal Rosedale Toronto services help identify hidden contamination and restore healthy indoor conditions. Attic Mold Removal Toronto Attics frequently experience mold growth because of poor ventilation, roof leaks, and condensation. Warm indoor air rising into attic spaces creates moisture that accumulates on wood framing and insulation. Our Attic Mold Removal Toronto services remove mold and fix ventilation issues that can cause it to return. Water Damage and Mold Removal Toronto Water damage remains one of the leading causes of mold contamination. Plumbing leaks, flooding, roof damage, and foundation seepage can create ideal conditions for mold growth in 24 to 48 hours. Professional Water Damage and Mold Removal Toronto services help property owners address both moisture issues and mold contamination before significant damage occurs. Signs You Need Mold Removal Services in Rosedale Early detection of mold problems protects both property value and occupant health. Visible Mold Growth Indicators Mold often appears as fuzzy, slimy, or discolored patches on walls, ceilings, wood, drywall, and other surfaces. Common colors include black, green, white, brown, and gray. Visible mold growth ranks among the clearest signs that you need professional remediation. Musty Odours and Hidden Mold A persistent musty odor often indicates mold growth before visible signs appear. Active mold colonies release microbial volatile organic compounds, which cause these odours. Hidden mold frequently develops behind walls, beneath flooring, inside crawlspaces, and within attic cavities. Professional inspections can identify concealed contamination before it spreads further. Signs You Need Mold Removal in Toronto Some of the most common warning signs include: Recognizing early signs that you need mold removal in Toronto can reduce structural damage and protect indoor air quality. Health Symptoms Linked to Mold Exposure Exposure to mold may contribute to: Individuals with allergies, asthma, or compromised immune systems may experience more severe symptoms. Water Damage and Moisture Problems Mold can begin growing within 24 to 48 hours when excess moisture is present. Water stains, warped materials, peeling paint, and recurring dampness often indicate conditions that support mold growth. Prompt action helps reduce the risk of extensive contamination. Our Mold Removal Process for Rosedale Properties Our Mold Remediation Rosedale Toronto team follows a proven process designed to ensure thorough removal and long-term protection. Initial Mold Inspection and Assessment We begin with a comprehensive visual inspection of the property. Our specialists identify visible mold growth, water damage, and moisture intrusion points. We utilize: Homeowners who need a mold inspection in Toronto can trust CPR24 Restoration. They offer detailed assessments and professional recommendations. Mold Testing and Analysis Our Mold Testing and Removal Toronto services help determine contamination levels and identify the specific conditions contributing to mold growth. Professionals may conduct air and surface sampling
Introduction If you’re searching for Mold Removal Parkdale, you may have noticed musty odors. You might also see mold growth or water damage. Indoor air quality may be getting worse at your home or business. Mold is a common problem across Toronto, but Parkdale homes face unique challenges. This is because of Lake Ontario nearby, older homes, and seasonal humidity changes. At CPR24 Restoration, we provide Professional Mold Removal Parkdale residents and business owners can trust. Our team specializes in identifying moisture sources, removing contamination safely, restoring damaged materials, and helping prevent future mold growth. Whether you need basement mold removal in Parkdale, we can help. If you need attic mold removal in Parkdale, we can help. Whether you need bathroom mold removal in Parkdale, we can help. Our certified technicians also provide complete mold damage restoration in Parkdale. Mold can begin growing within days when moisture is present. Unfortunately, many owners do not notice the problem at first. It can spread behind walls. It can spread under floors. Also can spread in attics. It can also spread through HVAC systems. That’s why prompt action and professional remediation are essential. Why Parkdale Properties Are Vulnerable to Mold Growth Lake Ontario Humidity and Moisture Exposure Parkdale’s location near Lake Ontario contributes to elevated humidity levels throughout much of the year. Warm summer air carries moisture into homes through windows, doors, ventilation systems, and small structural gaps. During winter, warm indoor air comes into contact with cold exterior surfaces, causing condensation. Over time, repeated moisture cycles can create ideal conditions for mold growth behind walls, inside insulation, and under flooring. These environmental factors make Mold Remediation Parkdale an important service for homeowners and property managers throughout the neighborhood. Older Homes and Ventilation Challenges Many Parkdale homes were built decades ago and were not designed with modern moisture management systems. Renovations often improve energy efficiency but can unintentionally trap moisture indoors. Common issues include: Without proper airflow, humidity becomes trapped inside the structure, creating ideal conditions for mold colonies to develop. Water Damage and Mold Growth Water damage is one of the leading causes of mold contamination. Leaking pipes, roof damage, foundation cracks, appliance failures, and floods can add moisture that stays hidden for weeks or months. This is why Water Damage and Mold Removal Parkdale services often go hand in hand. Addressing moisture at its source is critical to preventing recurring contamination. Common Areas Where Mold Develops Our Local Mold Removal Experts Parkdale frequently discover mold growth in: Basements Basements are particularly vulnerable because they are below grade and often experience higher humidity levels. Common basement mold locations include: Professional Basement Mold Removal Parkdale services help identify hidden contamination and address moisture sources before structural damage occurs. Bathrooms Bathrooms generate significant humidity from showers, baths, and daily water use. Common problem areas include: When mold becomes established, Bathroom Mold Removal Parkdale specialists can safely eliminate contamination while preventing spore spread. Attics Poor attic ventilation often leads to condensation and mold growth. Our Attic Mold Removal Parkdale team frequently encounters contamination caused by: Commercial Buildings Businesses face similar risks, particularly in restaurants, offices, retail spaces, apartment buildings, and healthcare facilities. We design our Commercial Mold Removal Parkdale services to minimize disruption and protect employees, customers, and tenants. Signs You Need Professional Mold Removal Parkdale Services Visible Mold Growth Visible mold can appear in various colours, including: Even small patches can indicate a much larger hidden issue. If you discover contamination, avoid disturbing it and contact a Certified Mold Remediation Parkdale professional. Persistent Musty Odours A strong earthy or musty smell often indicates hidden mold growth. Many homeowners notice odors long before they discover visible contamination. Indoor Air Quality Concerns Mold spores can circulate throughout your property and contribute to: Water Damage Indicators Watch for: These signs often indicate conditions that require Mold Inspection Parkdale and professional assessment. Professional Mold Remediation Process Mold Inspection and Testing Every successful project begins with a thorough assessment. Our mol Parkdale process includes: When necessary, we also perform Mold Testing Parkdale to better understand contamination levels and environmental conditions. Containment Containment prevents spores from spreading during removal. Our technicians install: Mold Removal and Cleaning Our Mold Removal Services Parkdale include: For severe contamination involving hazardous fungal growth, we perform specialized Black Mold Removal Parkdale procedures using industry-approved protocols. Air Filtration and Verification HEPA air scrubbers operate throughout remediation to improve indoor air quality and capture airborne spores. Restoration As a full-service restoration company, CPR24 Restoration also handles repairs and reconstruction after remediation is complete. Our Mold Damage Restoration Parkdale services help restore affected areas efficiently and professionally. Residential and Commercial Mold Removal Parkdale Residential Mold Removal Parkdale We help homeowners address mold issues in: Commercial Mold Removal Parkdale We also provide professional remediation for: Why Choose CPR24 Restoration When searching for the Best Mold Removal Company Parkdale, experience, training, and responsiveness matter. CPR24 Restoration offers: Our team is committed to delivering Affordable Mold Removal Parkdale solutions without compromising quality or safety. Whether you searched “Mold Removal Near Me” or “Mold Remediation Near Me,” CPR24 Restoration can help. If you searched “Best Mold Removal Company Near Me,” we can help too. We provide reliable service in Parkdale and across the Greater Toronto Area. Emergency Mold Removal Parkdale Certain situations require immediate attention, including: Our Emergency Mold Removal Parkdale team responds quickly to help minimize damage and reduce the risk of widespread contamination. Mold Cleanup Services Toronto As a trusted restoration company, CPR24 Restoration provides Mold Cleanup Services Toronto property owners depend on. Our team serves Parkdale and surrounding communities with comprehensive remediation and restoration services. Whether you need Residential Mold Removal in Parkdale or Commercial Mold Removal in Parkdale, we can help. We also handle Toxic Mold Removal in Parkdale and full Mold Removal Toronto services. We have the expertise and equipment to restore your property safely. Conclusion Mold growth can affect the safety, comfort, and value of your property. Because Parkdale experiences elevated humidity levels, older building
Noticing signs of mold in your house can be alarming. For residents concerned about mold removal Uxbridge homeowners should be aware of the potential health effects. It can be worse if you have headaches, breathing trouble, or ongoing sinus infections. These symptoms can affect people living in homes with mold and damp conditions and may lead to eye and throat irritation, coughing, and wheezing. With thousands of mold species across North America, it is vital to find and fix mold fast. This helps protect your property and health. If you’re wondering what to do if you find mold in your house, you’re not alone. Many homeowners in Uxbridge discover mold after a plumbing leak, roof leak, basement flooding event, or hidden moisture problem. Whether you’re dealing with visible mold growth on walls, ceilings, or flooring, acting quickly is essential. At CPR24 Restoration, we offer professional mold removal Uxbridge, mold remediation in Uxbridge, and emergency restoration services. We stop mold at its source and help prevent it from coming back. Mold can begin growing within 24 to 48 hours after moisture enters a building. That’s why people often find mold after water damage, only days after a flood, burst pipe, or appliance leak. Understanding the warning signs and taking the proper steps can help protect your property and your family’s health. Understanding the Mold in Your Home Mold is a type of fungus that reproduces through microscopic spores floating through indoor and outdoor air. These organisms generally fall into three broad categories: Mold requires three things to survive: Without moisture, mold cannot grow. This is why water damage and humidity control play such a critical role in mold removal Uxbridge prevention. Common Types of Mold Found in Uxbridge Homes Stachybotrys Chartarum (Black Mold) Often called black mold, this species looks dark green or black. It often grows on drywall, wood, insulation, and other cellulose materials. Moisture often affects these materials for a long time. Aspergillus One of the most common indoor molds, Aspergillus can be found in walls, insulation, HVAC systems, and dust. Certain strains may contribute to respiratory problems. Penicillium This fast-growing blue-green mold frequently develops on carpeting, wallpaper, insulation, and water-damaged materials. Cladosporium Commonly found on wood, fabrics, HVAC systems, and carpets, Cladosporium can thrive in both warm and cool environments. Alternaria Alternaria is frequently found in bathrooms, kitchens, and around leaking windows where moisture levels remain elevated. Signs of Mold in Your Home Many homeowners don’t realize they have a mold problem until symptoms begin affecting their daily lives. Some of the most common signs of mold in your home include: Even if mold is not visible, hidden contamination may exist behind walls, beneath flooring, inside ceilings, or within insulation. A professional mold inspection Uxbridge service can help identify hidden mold before extensive damage occurs. Mold Symptoms and Health Risks People react differently to mold exposure depending on their age, health condition, and sensitivity levels. Common symptoms include: Many homeowners ask, can mold make you sick? The answer is yes. Prolonged exposure to mold can contribute to a variety of respiratory and allergy-related symptoms. The potential health risks of mold exposure are especially concerning for: Another common question is, is mold dangerous to your health? While not every mold species is toxic, prolonged exposure can worsen respiratory conditions and contribute to chronic health concerns. Certain black mold symptoms may include persistent coughing, wheezing, headaches, sinus irritation, and difficulty breathing. How Mold Grows and Spreads Mold reproduces by releasing microscopic spores into the air. These spores can travel throughout a home through: Once spores land on a damp surface, mold growth can begin within 24 to 48 hours. Common moisture sources include: Because spores spread so easily, even a small mold problem can quickly become a much larger issue if left untreated. Immediate Steps to Take After Finding Mold Assess the Size of the Mold Problem The first step is determining how much mold is present. If you correct the moisture source, you can sometimes clean small areas measuring less than 10 square feet safely. However, larger areas often require professional intervention. Identify and Stop the Moisture Source A mold problem is almost always a moisture problem. Look for: Addressing the moisture source is critical. Without fixing the underlying issue, mold will likely return. Isolate the Area Containment helps prevent spores from spreading throughout the home. Seal the affected areas with plastic sheeting, and do not run HVAC systems until you address the contamination. Wear Proper Protective Equipment Before approaching mold, wear: Individuals with asthma, allergies, or respiratory conditions should avoid mold cleanup whenever possible. How to Get Rid of Mold in Basement Areas One of the most common homeowner questions is how to get rid of mold in basement spaces. Basements are especially vulnerable because they often experience: Many cases of wet basement mold problems begin with a minor leak that goes unnoticed for weeks or months. If mold is discovered in a basement, it’s important to: Basements often require professional drying equipment to eliminate hidden moisture trapped behind walls and flooring. Mold After Water Damage and Flooding One of the leading causes of mold growth is water intrusion. When a property experiences flooding, burst pipes, roof leaks, or appliance failures, mold can begin developing within days. Many homeowners discover basement mold after flooding because moisture becomes trapped behind drywall and under flooring materials. At CPR24 Restoration, we offer full water damage and mold removal Uxbridge services. We fix water damage and remove related contamination. Successful flood restoration and mold removal Uxbridge requires: Without proper drying, mold often returns even after visible growth has been cleaned. Mold Inspection and Mold Testing in Uxbridge Sometimes mold contamination extends far beyond what is visible. Professional mold inspection Uxbridge services can help identify: Professional mold testing Uxbridge services may also be recommended when: Testing and inspection provide valuable information about the extent of contamination and help determine the most effective remediation strategy. Mold Removal Uxbridge and Cleanup Process When DIY
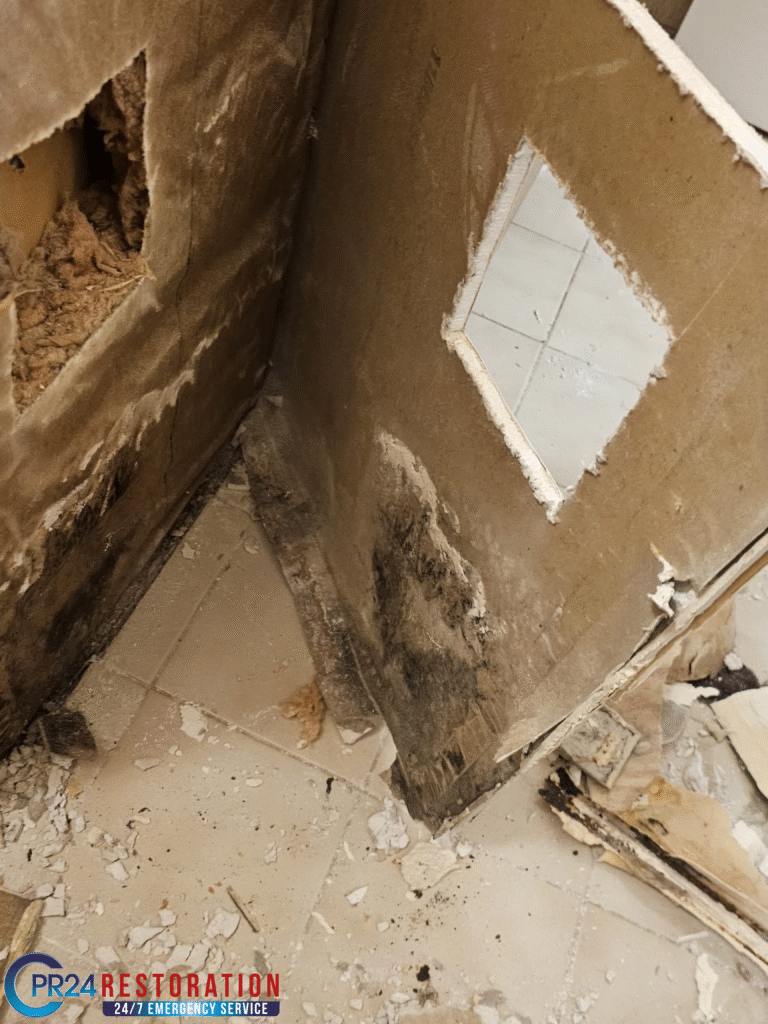
Ossington is one of Toronto’s most desirable neighbourhoods, known for its historic charm, character homes, and vibrant community. However, builders constructed many beautiful homes in Ossington, Trinity Bellwoods, Little Italy, and nearby West Toronto decades ago. Builders constructed them long before modern waterproofing and ventilation standards. While these older properties offer unique architectural appeal, they are also more susceptible to mold problems than newer homes. At CPR24 Restoration, we often help homeowners and property managers handle mold in Ossington homes. Old building materials, hidden moisture, water damage, and poor ventilation often cause it. Understanding why mold problems are common in older Toronto homes can help owners. It helps them spot issues early. It also helps them avoid costly damage. Why Older Toronto Homes Are More Vulnerable to Mold Many of the homes throughout Ossington were built before modern construction techniques and moisture-control systems became standard. As these properties age, they become increasingly vulnerable to moisture intrusion and mold growth. Older building materials like wood framing, plaster walls, paper-faced drywall, and old insulation can absorb moisture. They can also hold it for a long time. Once moisture becomes trapped inside walls, ceilings, or flooring systems, mold can begin developing within 24 to 48 hours. Many property owners are surprised to find hidden mold in older homes. It often grows behind walls, under floors, in attics, or in crawl spaces. This can happen long before you see any signs. This is a key reason mold problems in older Toronto homes are still common in Ossington and nearby areas. Common Mold Issues in Toronto Houses Although mold can develop almost anywhere moisture is present, certain areas are particularly vulnerable in older homes. Mold problems in older Toronto homes Basement Mold Problems Basements remain one of the most common locations requiring basement mold removal in Ossington. Many older foundations lack modern waterproofing systems. Moisture often seeps through concrete walls and floors. Common basement issues include: When moisture accumulates in a basement, mold can spread quickly throughout drywall, wood framing, carpeting, and stored belongings. Proper damp basement mold prevention is critical for maintaining a healthy home environment. Attic Mold Growth Attic mold removal in Toronto has become increasingly common because of inadequate ventilation in older homes. Warm air from kitchens, bathrooms, and living spaces naturally rises into the attic. When this warm air meets colder attic surfaces, condensation forms and creates ideal conditions for mold growth. Signs of attic mold include: Without proper attic ventilation, mold can continue spreading throughout the roof structure. Mold Behind Walls One of the most challenging issues homeowners face is mold behind walls in Toronto properties. Because the mold remains hidden, many people are unaware of the problem until significant damage has already occurred. Mold problems in older Toronto homes Common causes include: Professional mold inspection in Ossington often uncovers hidden mold that property owners never knew existed. Water Damage and Mold Growth A direct connection exists between water damage and mold growth. Any time a property floods, has plumbing leaks, roof leaks, appliance failures, or foundation seepage, mold can start soon after. If you do not dry the affected materials properly, mold can grow. Water damage and mold growth frequently occur together because mold spores naturally exist in indoor environments. Once moisture becomes available, spores quickly colonize building materials. Common water damage sources include: Many homeowners discover mold after water damage weeks or even months after the original incident occurred. This is why rapid response and professional drying are essential following any water intrusion event. Mold in Century Homes and Victorian Homes Many properties throughout Ossington fall into the category of century homes or Victorian-era homes. While these structures possess tremendous character and historical value, they also present unique mold challenges. Mold in century homes in Toronto is often caused by: Similarly, mold in Victorian homes in Toronto frequently develops due to hidden moisture problems that have accumulated over decades. These homes often contain multiple renovations performed over the years, creating concealed spaces where moisture can become trapped. What Causes Mold Growth? Homeowners often ask, “What causes mold growth?” The answer is simple: moisture. Mold requires three things: Unfortunately, older Toronto homes provide all three. Common causes include: Condensation and Mold Growth Condensation and mold growth are closely connected. When warm indoor air touches cold surfaces like windows, outside walls, or attics, moisture forms. Over time, repeated condensation can create conditions ideal for mold development. Moisture Problems in Toronto Homes Toronto’s seasonal climate contributes significantly to moisture problems in Toronto homes. Heavy rain, snow accumulation, freeze-thaw cycles, and high summer humidity levels all increase the likelihood of moisture intrusion. Poor Ventilation Bathrooms, kitchens, laundry rooms, and basements often experience inadequate airflow. Without proper ventilation, humidity levels rise and mold growth becomes more likely. Signs of Mold in Your Home Recognizing the signs of mold in your home early can help prevent extensive property damage. Common warning signs include: Even if visible mold is not present, persistent musty odors may indicate hidden mold in older homes. Health Risks of Mold Exposure Many people underestimate the health risks of mold exposure. While reactions differ, mold can harm indoor air quality. Mold contamination can also cause health symptoms in sensitive people. Potential symptoms include: Children, seniors, and individuals with compromised immune systems are often more vulnerable to mold-related health concerns. Maintaining healthy indoor air quality and mold prevention strategies is important for protecting occupants and improving overall comfort. Why Professional Mold Inspection Matters Many mold problems remain hidden until significant damage occurs. A professional mold inspection in Ossington can identify: At CPR24 Restoration, our team uses professional equipment to locate moisture and identify areas that may require remediation. For homeowners looking for the best mold inspection Ossington services in Ossington, early detection often prevents major damage. Mold Testing Toronto: Is It Necessary? Mold testing Toronto services can help determine the type and concentration of mold present within a property. While testing is not always necessary when visible mold exists, it can
Mold removal services in Leaside are critical. Mold can spread through your property in 72 hours or less. Left untreated, mold poses health risks and causes both cosmetic and structural damage to your home. Water intrusion from flooding, leaks or damaged materials like carpet and drywall creates the perfect conditions for mold growth. Finding the right mold remediation Leaside company is crucial, as professional mold treatment companies use specialized techniques including containment, HEPA filtration and antimicrobial treatments. Understanding mold removal cost matters just as much, with single-area treatment ranging from $1,250 to $3,000. CPR24 Restoration is rated the best mold removal company in the Leaside area. Top Mold Removal Companies in Leaside Selecting the right mold removal leaside provider requires understanding the qualifications and services that separate professional companies from inadequate ones. Multiple certified specialists serve the Leaside area. Each brings different strengths to mold inspection toronto and removal projects. IICRC Certified Leaside Mold Remediation Specialists The Institute of Inspection, Cleaning and Restoration Certification sets the global standard for restoration professionals. IICRC certification confirms that technicians understand proper containment procedures and safe removal methods. They also know air filtration systems, structural drying techniques, moisture detection and prevention practices. Emergency Response Services in Leaside Rapid response is critical for containment because mold spreads in 72 hours or less. CPR24 Restoration provides 24/7 emergency services throughout the Leaside area. Our team identify moisture sources and establish containment. They prevent further spread, start structural drying and protect unaffected areas. Licensed and Insured Professionals CPR24 Restoration has proper licensing and insurance to protect both property owners and workers. Certified mold services include commercial liability insurance, WSIB coverage, clearance certificates and detailed remediation plans. Our certified company in Leaside maintain proper licensing, insurance and BBB accreditation. Our technicians follow IICRC protocols found in the S-500 and S-520 standards. What to Look for in a Mold Removal Company Choosing the right mold removal company protects your property and health. Toronto has many specialists. You need to know what sets qualified contractors apart from inadequate ones. This helps you make informed decisions. Certified Technicians and Proper Training IICRC or NAMP accreditation matters when you select a mold remediation Toronto provider. These certifications verify that technicians understand proper protocols beyond simple training certificates. IICRC certification requires a minimum of one year of verifiable mold remediation field experience. Certified professionals demonstrate competency in mold remediation for structures and safe work in contaminated environments. Experience with Toronto Area Properties Specialists with residential and commercial experience understand how mold infiltrates different areas and rooms of homes. Firms versed in condo bylaws or heritage homes bring valuable knowledge to GTA properties. This local expertise matters when you deal with Toronto’s specific building types and moisture challenges. Eco-Friendly Mold Removal Methods Harsh chemicals that may harm your family or pets should be avoided. Professional companies use human-safe chemicals and all-natural solutions to address visible growth and underlying moisture problems. Eco-friendly approaches appeal to homeowners who want mold treatment companies without aggressive chemical treatments. The Mold Remediation Process in Leaside Professional mold removal Leaside follows a systematic approach that addresses visible contamination and moisture mechanisms. Each stage builds upon the previous to restore safe conditions. Original Mold Inspection and Testing Inspectors conduct visual assessments of affected and adjacent areas. They use thermal imaging cameras and hygrometers to detect hidden moisture. Visible mold growth makes sampling unnecessary in most cases. Surface sampling may help determine whether cleaning or remediation removed contamination from an area. Air sampling tests mold spore concentration, while surface testing uses swabbing or tape lifting methods. Containment and Air Filtration Setup HEPA-filtered negative air machines are installed first. These machines pull contaminated air outside through flexible ducting. Plastic barriers isolate work zones from non-affected areas, with all HVAC systems, doorways and electrical outlets sealed. This negative-pressure environment will give airborne spores controlled conditions during removal. Removal of Contaminated Materials If porous materials like ceiling tiles and carpet become moldy, you must throw them away. Workers remove mold-contaminated materials and seal them in heavy duty bags before transport. Staff scrub hard surfaces with detergent and water, then dry them. Cleaning and Decontamination Salvageable surfaces receive antimicrobial treatments and HEPA vacuuming. Professional technicians apply commercial-grade antimicrobials to treated areas. This prevents mold from spreading and stops new growth from developing. Moisture Control and Prevention Plumbing leaks and other water problems should be fixed as soon as possible to prevent recurrence. Indoor humidity should stay between 30% and 50% relative humidity. Proper drainage, exhaust fans and dehumidifiers create environments inhospitable to future mold growth. Contact CPR24 Restoration for Best Mold Removal Toronto! Mold spreads fast, but choosing the right remediation specialist doesn’t must be complicated. We’ve shown you how to identify certified professionals, understand fair pricing and recognize quality service in Leaside. FAQs Q1. Is it safe to remain in my home while mold removal is taking place? If you have asthma, COPD, or a weak immune system, do not stay in a home with mold. Do not be present during cleaning. For others, staying in the home may be possible with proper precautions. Reducing exposure during cleanup is important. Use containment barriers to isolate the affected areas. Ensure good ventilation during remediation. Q3. What qualifications should I look for when hiring a mold removal company? Look for IICRC (Institute of Inspection, Cleaning and Restoration Certification) certified technicians. They should have at least one year of verified field experience. Make sure the company holds the proper licenses and insurance and follows industry protocols. Certified professionals should understand containment procedures, air filtration systems, moisture detection, and safe removal methods. Q4. How quickly does mold spread in a home? Mold can spread throughout your property in 72 hours or less after water intrusion occurs. This rapid growth makes emergency response critical for effective containment. Professional remediation companies often offer 24/7 emergency services to address mold issues quickly and prevent further spread. Q5. What factors influence the cost of mold remediation? Several factors affect mold removal costs.