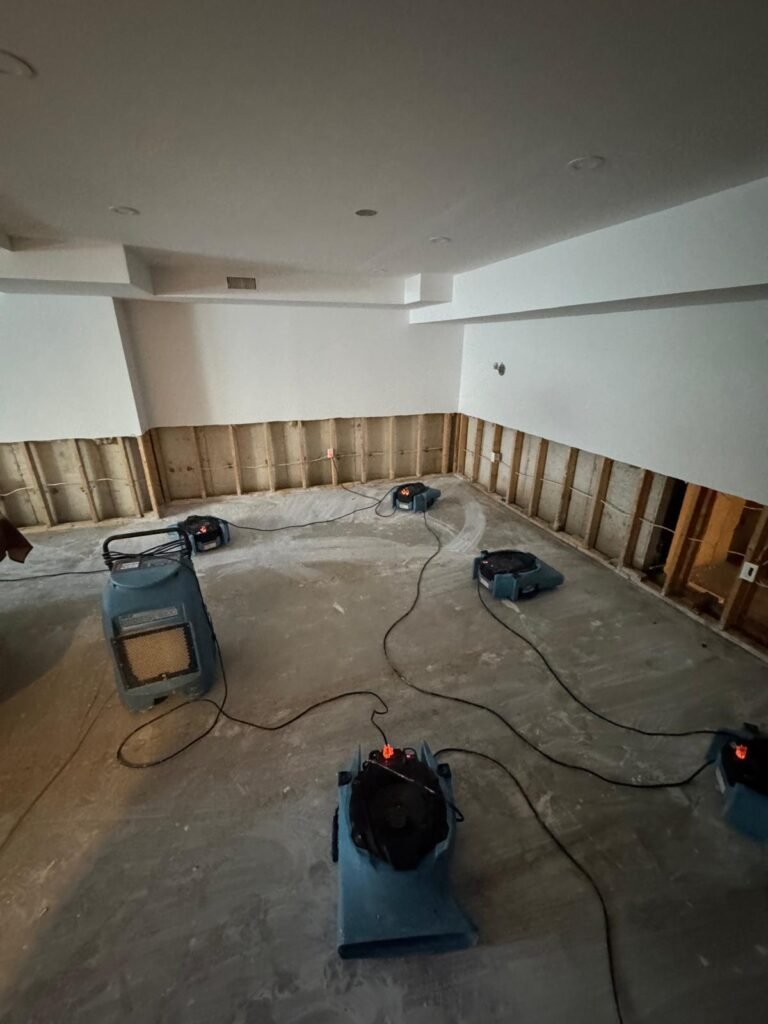
Uncategorised

Uncategorised

Mold Removal in Central Toronto

Mold removal in Toronto is more than just cleaning visible spots. Protecting your health, property, and investment is essential. In Central Toronto, seasonal humidity, frequent rain, and aging homes make mold infestations a recurring issue. Mold can hide behind drywall, spread in basements, or grow in attics. Professional mold removal services are important for keeping your home or business safe. This guide explains how to identify mold. It also covers the risks of mold, how to remove it professionally, the costs involved, and ways to prevent it. Additionally, it provides tips on choosing the best mold removal companies in Toronto. Why Mold is a Major Issue in Central Toronto Central Toronto’s climate—humid summers, wet springs, and freezing winters—creates conditions that fuel mold growth. Moisture from rain, snowmelt, and leaks seeps into basements, attics, and bathrooms. A few reasons mold is common in Toronto homes include: Understanding Mold: Types, Causes & Spread Mold is a fungus that spreads by releasing microscopic spores. Once spores find a damp environment, they colonize quickly. Common Types of Mold in Toronto Homes Health Risks of Mold Exposure Prolonged exposure to mold can cause: Children, seniors, and those with weak immune systems are most at risk. This is why you must never delay mold removal in Toronto. Signs You Need Toronto Mold Removal Services Look for these warning signs: People often see these symptoms in places that need mold removal. This includes bathrooms, basements, and attics in Toronto. Professional Mold Removal Services For confined areas like attics, attic mold removal Toronto requires special equipment and experience. Cost of Mold Removal Toronto The mold removal cost depends on: On average, Toronto mold removal services range from $500–$6,000. For severe infestations, especially with black mold, costs may exceed $10,000. DIY vs. Professional Mold Removal DIY Mold Removal Professional Mold Removal Companies Toronto DIY can save money at first. However, hiring a CPR24 Restoration is usually safer and more effective. Seasonal Mold Growth in Toronto Insurance and Toronto Mold Removal Many homeowners wonder if mold removal Toronto cost is covered by insurance. Policies vary: Preventing Mold in Central Toronto Homes Tips for Homeowners By following these steps, you’ll reduce the need for future mold removal services Toronto. FAQs About Mold Removal in Toronto 1. How long does mold removal take? Small jobs (bathrooms or closets) take 1–2 days, while larger projects like full basement mold removal Toronto can take 5–7 days. 2.  Is black mold dangerous? Yes. Black mold removal Toronto should only be handled by certified experts because of the risk of toxic mycotoxins. 3. Can mold return after removal? Yes, if someone doesn’t address moisture issues. Reputable mold removal companies in Toronto provide prevention strategies. 4. How much does attic mold removal cost in Toronto? Typically $1,500–$5,000 depending on the size of the attic and severity of mold. 5. Do all mold problems require professional help? Minor surface mold can be cleaned DIY, but infestations larger than 10 sq. ft. require professional Toronto mold removal services. Choose CPR24 Restoration Mold infestations are a significant issue in Central Toronto. The climate, combined with older buildings, makes mold especially common in homes. As a result, timely remediation becomes essential. From bathroom mold removal in Toronto to extensive basement mold removal, professional help not only ensures safety but also guarantees long-term protection. In addition, it provides homeowners with peace of mind and reassurance. If you are looking for the best mold removal in Toronto, CPR24 Restoration offers trusted, certified, and affordable services. Moreover, by acting quickly rather than delaying, you can prevent mold from spreading further. Therefore, it is always recommended to contact a professional mold removal company in Toronto as soon as possible. We offer complete inspection and remediation plans designed to eliminate mold at its source. Equally important, we proudly serve both homeowners and businesses throughout Toronto. Our coverage extends across Central Toronto neighborhoods. For example, we serve Alexandra Park, The Annex, Baldwin Village, and Cabbagetown. Furthermore, our services include CityPlace, Chinatown, Church and Wellesley, Corktown, and the Discovery District. In addition, the Distillery District, Entertainment District, East Bayfront, and Fashion District are part of our service area. We also cover the Financial District, Garden District, Grange Park, and Harbour Village. Moreover, we provide reliable mold removal services in Harbourfront, Kensington Market, Moss Park, and Old Town. Similarly, our expertise extends to Queen Street West, Regent Park, South Core, and St. James Town. Finally, we also serve St. Lawrence, Trefann Court, University, Huron-Sussex, and Yorkville. Conclusion In the East End, we proudly serve numerous communities. For instance, our coverage includes: Not only do we provide services in Central and East Toronto, but we also extend our expertise to North Toronto. This includes, for example, Allenby, Bedford Park, Chaplin Estates, Davisville Village, Lawrence Park, Lytton Park, and Yonge–Eglinton. In the West End, our service is equally extensive. We proudly serve neighborhoods such as Beaconsfield Village, Bloor West Village, and Bloorcourt Village. Additionally, we cover Bracondale Hill, Brockton Village, and Carleton Village. Moreover, communities like Corso Italia, Davenport, and Dovercourt Park are also part of our service network. In fact, we also provide full coverage in Dufferin Grove, Earlscourt, and Fort York. High Park, The Junction, and Junction Triangle also benefit from our expert services. Likewise, we extend support to Koreatown, Liberty Village, and Little Italy. Furthermore, we proudly serve Little Portugal, Little Tibet, and Mirvish Village. Our coverage continues with Niagara, Ordnance Triangle, and Palmerston. In addition, we serve Parkdale, Queen Street West, and Regal Heights. Finally, we also provide services in Roncesvalles, Runnymede, Seaton Village, Swansea, Trinity–Bellwoods, and Wallace Emerson, thereby ensuring that all Toronto communities have access to reliable mold removal solutions.

Uncategorised

Water Damage Restoration Central Toronto

Water damage restoration services in Toronto are crucial. Water and flood damage often cause property damage in Canada. A disaster at your home or business requires immediate action. Our team guarantees to reach your location within 45-60 minutes to start the recovery process right away. Our extensive background spans over 20 years with more than 10,000 successful restoration projects. The team offers thorough training with the latest equipment. We also provide fast insurance claim processing through our partners in Central Toronto. We restore your affected areas to their original condition. This applies to flooded basements, burst pipes, and storm damage repairs. Our water restoration and repair services have helped many property owners in Toronto and Ontario. This makes us one of the most reliable water restoration Toronto companies in the area. Understanding Water Damage in Central Toronto Toronto properties face unique water damage challenges that need specialized restoration work. Property owners can better protect their investments. They should learn about the causes of water damage. They should also understand how our local climate affects their property. Knowing the early warning signs is important, too. Common causes of water damage in homes and businesses Water damage in Toronto usually starts with plumbing failures. Older Toronto homes built before the 1980s have aging pipes that often leak undetected for months. Roof problems create another major concern, especially when you have flat roofs on commercial buildings that collect water easily. The foundation creates serious risks, too. Southern Ontario’s freeze-thaw cycles make foundations contract and expand, which creates cracks where water seeps in. Small cracks let moisture penetrate during rainstorms or when snow melts. Bad exterior drainage ranks among the top causes of water getting in. Water collects around your property when the soil near the foundations doesn’t channel it away properly. Properties with clogged gutters or improper grading face worse problems during heavy rains. How Toronto’s climate contributes to water-related issues Toronto’s climate increases water damage risks a lot throughout the year. Ice dams form along rooflines in winter and block melting snow, which forces water under shingles into attics. Summer brings heavy thunderstorms with intense rainfall. In July 2024, nearly 10 centimetres of rain fell in just three hours. This heavy rain overwhelmed the city’s infrastructure. These weather patterns have made flooding Canada’s most common and expensive disaster. The July 2024 flash floods caused over CAD 1.39 billion in insured damages. Toronto’s urban growth removed natural water-absorbing features like wetlands and forests. Signs of hidden water damage to look out for You can save thousands in repair costs by catching water damage early. Persistent earthy or musty odors in basements or crawl spaces often point to hidden moisture problems. Bubbling, peeling, or cracking paint or wallpaper suggests moisture behind surfaces. Yellow or brown water stains on ceilings and walls usually reveal leaky roofs or plumbing. Wooden floors that warp or feel soft underfoot might absorb moisture from below. Small patches of mold on walls, ceilings, or around baseboards hint at bigger hidden issues. Your water bills suddenly spiking could mean leaking pipes. Sagging ceilings often happen because of water buildup. Basements that stay damp after rainfall need attention too. The Water Damage Restoration Toronto Proces The water damage restoration process follows a scientific approach that ensures full recovery of affected properties. The process needs specialized equipment and certified professionals who follow industry-standard protocols. 1. First look and damage check Professional restoration starts with a complete evaluation that uses advanced technology. Certified technicians use infrared cameras and moisture meters to find hidden water pockets inside walls or under floors. The team classifies water contamination into three categories: clean water (safe), gray water (contaminated with bio-pollutants), and black water (severely contaminated, typically sewage). This assessment helps technicians create a detailed fix-it plan and document everything for insurance claims. 2. Getting rid of water The team focuses on removing standing water quickly after completing the assessment. Restoration teams use powerful pumps, specialized vacuums, and water extractors to remove water. Quick extraction matters because water can spread faster, which increases damage and costs every hour. A certified team’s early arrival gives a better chance to reduce structural damage and stop mold from growing. 3. Making everything dry The area needs complete drying after water removal. This stage uses strategically placed air movers, industrial dehumidifiers, and specialized drying equipment. The technicians create moisture maps to spot areas without proper air flow that could lead to mold. This process takes 3-7 days depending on materials and conditions. 4. Making it clean and safe The next step involves cleaning and disinfection to kill contaminants and prevent mold growth. The team applies antimicrobial treatments throughout affected areas. They clean all usable items using the right methods for each type of material. They also safely remove and dispose of damaged materials. 5. Fixing and rebuilding The last phase brings the property back to its original condition. The work might include replacing drywall, flooring, insulation, or rebuilding certain areas completely. Certified companies handle everything from small fixes to full rebuilds, which removes the need to work with multiple contractors. Choosing the Right Water Damage Restoration Company Choosing a qualified water damage company in Toronto can make a significant impact. It can lead to proper recovery or lasting property issues. Let’s get into what makes the water damage services in Toronto stand out from less reliable options. What to look for in a certified restoration company Water damage requires companies with proper credentials and 24/7 emergency response capabilities. Reputable restoration professionals should give free inspections, clear documentation, and transparent quotes. You need to check that they use advanced tools. These include thermal imaging cameras and high-quality dehumidifiers. These tools find and fix hidden moisture. Why IICRC certification matters – Water Damage Restoration Toronto The Institute of Inspection Cleaning and Restoration Certification (IICRC) sets industry standards that legitimate restoration companies must meet. IICRC-certified technicians have specialized knowledge about water damage classification, equipment operation, and effective drying techniques. Their recognized protocols earn respect from insurance companies, which helps streamline your claims process. Questions to ask before hiring a restoration service You should think about asking these questions before choosing a water damage restoration service: Benefits

Uncategorised

Water Restoration & Flood Restoration in Toronto

Water damage is one of the most stressful emergencies a property owner can face. Quick and professional water restoration is crucial if you have a burst pipe, basement flooding, or storm damage. This helps protect your home or business. In this guide, we will cover what you need to know about water restoration in Toronto. We will help you find the right water damage company. We will also explain when to call for emergency flood damage services. What is Water Restoration? Toronto Water restoration is the complete process of cleaning, drying, repairing, and restoring your property after water damage. In Toronto, professional companies like CPR24 Restoration follow IICRC standards to ensure your property is safe and fully restored. The typical Toronto water restoration process includes: When to Call an Emergency Flood Service Not all water damage can wait until morning. Emergency flood services are available 24/7 to handle severe flooding, sewer backups, and storm damage. You should call immediately if: At CPR24 Restoration, our team arrives within 45 minutes for emergency calls in Toronto and the GTA. Preventing Future Water Damage Common Causes of Water Damage in Toronto Toronto homeowners deal with many water damage threats year-round. You can protect your home better by knowing what causes these problems and how to act fast when they happen. Burst pipes and plumbing failures Winter’s freezing temperatures create the perfect setup for burst pipes in Toronto. Water expands as it freezes inside pipes and puts pressure on them until they break. Homes built before the 1960s face higher risks because they might still have old galvanized steel pipes that rust from the inside. The problem worsens with high water pressure, blocked pipes that create pressure, and accidental damage during home renovations. Sewer backups and sump pump issues A broken sump pump can flood your basement quickly. Power cuts during storms, broken float switches, and blocked intake screens often cause these pumps to fail. The discharge pipes might freeze in winter or get clogged with debris, which stops water from draining properly. Tree roots grow into pipes, block main sewer lines, or city systems fail to handle heavy rain, causing sewer backups. These backups don’t just damage your property – they bring contaminated sewage into your home that can make you sick. Appliance leaks and overflows Your household appliances can cause serious water damage, too. Water often floods homes because of cracked dishwasher hoses, broken washing machine connections, and leaky toilets. Small leaks under your kitchen and bathroom sinks can damage cabinets, floors, and walls before you even notice them. Water heaters can suddenly break and spill gallons of water throughout your home. Stormwater and roof leaks Toronto gets lots of rain and snow, especially during spring and fall. Heavy rainfall and melting snow can overwhelm drainage systems and flood basements while damaging foundations. Your roof can let water in through damaged shingles, cracked flashing, and clogged gutters. This water soaks through insulation, leaves stains on your ceiling, and can weaken your home’s structure over time. Emergency Water Damage Restoration Process Our water damage remediation/restoration companies in Toronto follow a systematic process to fix water-damaged properties. Their multi-step approach will give a proper recovery and stop secondary damage like mold growth. Mold can start growing within 24-48 hours after water exposure. Step 1: Original inspection and damage assessment Certified technicians evaluate the property to find damage extent and create an action plan. They use moisture meters, thermal imaging cameras, and specialized equipment to spot hidden water that you can’t see. The professionals document everything with photos and detailed notes that help with insurance claims. The team classifies water contamination into three types. Category 1: Clean water, Category 2: Gray water with pollutants, Category 3: Black water from sewage. Step 2: Water extraction and moisture removal The technicians start removing standing water with powerful extraction equipment right after assessment. They employ industrial-grade pumps, truck-mounted extractors, and specialized wet vacuums to remove water quickly. Quick water removal is important. It reduces drying time and prevents more damage to building materials and belongings. Step 3: Drying and dehumidification The team focuses on structural drying after extraction. They place air movers and commercial dehumidifiers in affected areas to speed up moisture evapouration. This scientific process needs expert knowledge and constant monitoring with moisture meters to track progress. Professional drying takes 3-7 days to bring materials back to normal moisture levels, depending on conditions and damage severity. Step 4: Disinfection and odour control The technicians clean and disinfect all affected surfaces with EPA-registered antimicrobial products after drying. This step kills bacteria, mold, mildew, and other contaminants while preventing bad odours. The team might use special disinfection techniques and hydroxyl generators for stubborn odours. These tools neutralize odours at their source instead of masking them. Step 5: Structural repairs and water restoration The water restoration teams fix and rebuild damaged areas in the final step. They might replace drywall, insulation, flooring, and fix structural issues. This phase could involve small repairs or major reconstruction that needs specialized contractors, based on damage severity. Why Timely Response Matters Quick action after a disaster isn’t just about convenience. Your property, health, and finances are at stake. The first few hours after water damage are make-or-break for successful water restoration. Preventing mold and mildew growth Mold starts growing just 24 to 48 hours after water exposure. This makes quick water damage restoration a top priority. Established mold doesn’t just damage surfaces – it creates serious health risks. People can develop respiratory issues, allergic reactions, and their asthma symptoms get worse. Toronto’s water damage companies use specialized equipment to dry affected areas completely. This eliminates the moisture that mold needs to grow. Small water incidents can create perfect conditions for mold to spread everywhere, especially given Toronto’s climate conditions. Avoiding structural damage Water damage does more than just surface harm. It quietly attacks your home’s structural integrity. Your wooden beams, drywall, and insulation become weaker as water seeps in. The moisture goes deeper

Uncategorised

Will my insurance cover Water Damage?

Water damage can be a homeowner’s worst nightmare. A burst pipe, a leaky roof, or unexpected flooding can cause significant stress and expense. Many homeowners wonder, “Will my insurance pay for water damage?” One of the first questions homeowners ask is: “Will my insurance cover water damage?” At CPR24 Restoration, we understand how stressful these situations can be. This is especially true when you are trying to understand your home insurance for water damage. This guide will help you understand what it includes and what it does not. This will also show you how to increase your chances of getting the payout you deserve. Homeowners insurance often covers water damage from sudden and accidental events. However, the details can differ a lot between policies. Knowing the difference between home insurance and water damage coverage is important. You should also understand what water damage insurance does not cover before a disaster happens. By knowing your house insurance water damage terms in advance, you can act fast. This helps you avoid claim denials and protects your property and finances. Understanding Home Insurance and Water Damage Not all water damage is treated equally by your insurance provider. You need to understand the definition of water damage insurance in your policy to know if you’re protected. Types of Water Damage Typically Covered Most homeowners insurance cover water damage that is sudden and accidental. Common examples include: Average Insurance Payout for Water Damage The average insurance payout for water damage can vary widely depending on the cause and severity of the incident. In Ontario, payouts typically range from $3,000 to $15,000 for moderate incidents. Major flooding or structural damage can sometimes go over $30,000. Your settlement will depend on several factors. These include your home insurance water damage coverage limits and your policy deductible. It also matters if your policy offers replacement cost or actual cash value. If mold removal, structural repairs, or complete flooring replacement become necessary, claims for house insurance water damage may rise. In some cases, you may get extra living expenses (ALE) if you cannot stay in your home during repairs. This can increase your total claim amount. Insurance Water Damage Coverage – Common Exclusions Even the best home insurance cover water damage policies have exclusions. Common situations where your claim might be denied include: The Water Damage Insurance Claim Process When water damage strikes, following the right steps can make or break your water damage claim process. Step 1 – Stop the Source Shut off the water immediately to prevent further damage. Step 2 – Document Everything Take detailed photos and videos of the affected areas. Step 3 – Contact CPR24 Restoration & Your Insurance Our team can respond within 45 minutes to begin water damage restoration. We will also help you with home insurance and the water damage claim process. Does Home Insurance Cover Water Damage in Canada? Yes — but only for certain causes. Does insurance cover water damage in Canada depends on your policy’s terms. For example: Understanding these distinctions is critical for avoiding water damage claim denied situations. Will Insurance Pay for Flood Damage? Standard policies do not. To get coverage for overland flooding, you need to add a flood insurance endorsement to your home insurance policy. CPR24 Restoration helps homeowners. Many have claims denied because they think house insurance covers flood damage. The policy does not cover floods unless the document specifies it. How CPR24 Restoration Helps Maximize Your Claim We are an insurance-approved water damage restoration company serving Toronto & GTA. We help homeowners: Our team has experience working with adjusters. This way, you receive the payout you deserve, not just what the insurer first offers. Common Challenges in Water Damage Insurance Claims Denied Claims Reasons include: Low Settlement Offers Insurers may pay actual cash value instead of replacement cost, reducing your payout. We help document and justify full restoration costs. Preventing Future Home Insurance Water Damage Claims Regular Maintenance Install Water Detection Devices These alert you early to leaks and can reduce both damage and insurance premiums. If Your Claim Is Denied – Next Steps Mold After Water Damage – Is It Covered? Mold growth often follows water damage. Some homeowners insurance policies cover water damage that leads to mold only if the initial cause receives coverage. At CPR24 Restoration, we offer mold removal as part of our water damage services. This keeps your property safe and healthy. Why Choose CPR24 Restoration for Your Water Damage Needs When disaster happens, we restore your property. We also help you with home insurance and water damage. This way, you can get the average payout for water damage that you deserve. Whether you are asking, “Does home insurance cover water damage?” or trying to understand your coverage, preparation is key. Keep your home in good shape. Know the details of your insurance policy. Work with experts like CPR24 Restoration when you need to file a water damage claim. To protect your home from costly disasters, it’s important to understand how coverage for water damage works in your insurance policy. Unexpected damage to your home can lead to thousands in cost of repairs, especially after flooding, burst pipes, or roof leaks. To prevent water damage, take steps like regular maintenance and inspections. Installing leak detection systems can also help. These actions reduce risks and protect your property. They also prepare you in case you need to make a claim. If you have water damage and need expert help to restore your home, call CPR24 Restoration. Reach us at (416) 551-8287 for emergency service, available 24/7.

Uncategorised

15 Tips to Protect Your Home from Flooding in Toronto

Flooding can be a homeowner’s worst nightmare. This is especially true in a city like Toronto, which is why knowing how to protect your home from flooding in Toronto is crucial. Heavy rain and melting snow can cause serious water damage. Whether it’s basement flooding in Toronto or a burst pipe, these situations can be costly and stressful. Fortunately, there are numerous proactive measures you can take to safeguard your property from potential flooding. Below are 15 essential Toronto flood prevention tips that will help you protect your home from flooding and ensure your peace of mind. Understand Your Home’s Vulnerabilities Assess Your Property’s Flood Risk Before taking any preventive steps, it’s important to know the flood risks in Toronto related to your property. Factors such as location, elevation, and proximity to water bodies can influence your home’s vulnerability. Know Your Plumbing System Understanding your plumbing system is vital to prevent basement flooding and protect your home from water damage. Maintain Your Gutters and Downspouts Regular Cleaning Clogged gutters can lead to water overflow, increasing the risk of home flood damage. Extend Downspouts Ensure your downspouts direct water away from your home’s foundation. Invest in a Sump Pump Importance of a Sump Pump A sump pump is critical for Toronto basement waterproofing, especially in homes with below-grade basements. Regular Maintenance For sump pump installation in Toronto, CPR24 Restoration provides expert solutions and emergency backups. Waterproof Your Basement Seal Cracks and Openings Use waterproof sealants to close gaps in your foundation and basement walls. This is one of the most effective ways to protect your home from flooding. Install Window Well Covers Helps protect basement windows from water accumulation during storms. Landscape for Drainage Grading Your Yard Use Native Plants Monitor Your Appliances Regular Inspections Install Water Sensors Be Cautious with Your Drains Avoid Pouring Harmful Substances Regular Drain Maintenance Prepare for Emergencies Create an Emergency Plan Assemble an Emergency Kit Consider Flood Insurance Understand Your Policy Document Your Property Utilize Municipal Resources Research Local Programs Toronto has programs to help lower flood risk. These include rebates for installing sump pumps and backwater valves. Regularly Inspect Your Home Schedule Routine Inspections Hire our Professional By implementing these 15 tips, you can significantly reduce the risk of flooding in Toronto. Whether it’s basement flooding, clogged drains, or foundation leaks, being proactive is key. From sump pump installation Toronto to home flood protection tips, CPR24 Restoration is here to help. Protect your home, your peace of mind, and your family—starting today.

Uncategorised

What to Do If Your Toilet Overflows

Experiencing a toilet overflow can be a homeowner’s nightmare. The sudden rush of water spilling onto the bathroom floor can lead to panic and confusion. However, knowing how to respond effectively can minimize damage and restore order. This guide will help you with the important steps to take when your toilet overflows. You will learn how to handle the situation confidently and efficiently. Understanding the Causes of Toilet Overflows To manage an overflowing toilet, it’s important to know what caused the problem. Here are some common culprits: Clogs and Blockages One of the most frequent reasons for a toilet overflow is a clog. This can occur because: Malfunctioning Components Sometimes, the problem lies within the toilet’s internal mechanisms. Issues such as: Sewer Line Issues In some cases, the problem may extend beyond your toilet. A blockage in the sewer line can cause backflow, leading to an overflow. Signs of sewer line issues include: Immediate Actions to Take When Your Toilet Overflows When faced with an overflowing toilet, swift action is essential. Follow these steps to mitigate damage and restore functionality. Step 1: Stop the Flow of Water The first priority is to halt the water from overflowing. You can do this by: Step 2: Contain the Water Once the water flow is stopped, your next task is to contain the mess. Use towels or rags to soak up the excess water around the toilet. Avoid using paper towels, as they may disintegrate and create more mess. Step 3: Assess the Situation After containing the overflow, take a moment to assess the situation. Check for any visible blockages in the toilet bowl and determine if the water is clean or contaminated. This will guide your next steps. Cleaning Up After an Overflow Cleaning up after a toilet overflow cleanup is crucial to prevent water damage and bacterial growth. Here’s how to do it effectively. Step 4: Gather Cleaning Supplies Before you start cleaning, gather the necessary supplies: Step 5: Mop Up Excess Water Using your mop, begin soaking up the excess water on the floor. Wring out the mop frequently to remove as much water as possible. Dispose of the dirty water in a safe manner, such as down the bathtub drain. Step 6: Sanitize the Area Once the water is cleaned up, it’s essential to sanitize the affected area. Mix one cup of bleach with one gallon of water. Use this solution to wipe the floor and any surfaces that touched the overflow. Addressing the Clog After cleaning up, it’s time to tackle the root cause of the overflow: the clog. Step 7: Use a Plunger A plunger is often the most effective tool for clearing a clogged toilet. Here’s how to use it: Step 8: Try a Toilet Auger If the plunger fails to clear the blockage, a toilet auger may be necessary. This tool can reach deeper clogs that a plunger cannot. Insert the auger into the toilet and crank it to break up the obstruction. Preventing Future Toilet Overflows Once you’ve dealt with the immediate issue, consider implementing preventive measures to avoid future toilet overflows emergency. Step 9: Be Mindful of What You Flush Educate your household about what can and cannot be flushed. Always dispose of items like paper towels, wipes, and feminine hygiene products in the trash. Step 10: Regular Maintenance Regularly inspect and maintain your toilet’s components. Replace worn-out flapper valves and ensure the float mechanism is functioning correctly. This proactive approach can help prevent future toilet overflow repair problems. Step 11: Schedule Professional Inspections Consider having CPR24 Restoration inspect your sewer lines and toilet systems periodically. They can identify potential problems before they escalate into major issues. When to Call CPR24 Restoration While many toilet overflow situations can be handled independently, there are times when professional help is necessary. Step 12: Persistent Clogs If you’ve tried plunging and using an auger without success, it may be time to call CPR24 Restoration. Persistent clogs could indicate a more serious issue within the plumbing system. Step 13: Signs of Sewer Problems If you notice gurgling sounds from other drains or foul odours, these could be signs of sewer line issues. CPR24 Restoration can diagnose and address these problems effectively. Step 14: Water Damage Concerns If the toilet overflow has caused a lot of water damage, like wet drywall or flooring, CPR24 Restoration can check the damage. They will suggest the right steps to fix it. If you’re dealing with a toilet that keeps overflowing, it’s important to act fast to prevent further damage. Knowing how to stop a toilet from overflowing can save you from costly water damage from toilet overflow. In many cases, a toilet backup or clog is to blame, and finding the right overflowing toilet solution is key. To stop a toilet from overflowing, turn off the water supply right away. Then, use a plunger or auger to clear the blockage. Regular maintenance and mindful flushing habits can also help prevent toilet overflow before it starts. Dealing with a toilet overflow can be stressful, but knowing how to respond can make all the difference. By following the steps in this guide, you can manage the situation, clean up the mess, and stop it from happening again. If you have any doubts or ongoing problems, feel free to contact CPR24 Restoration for help. Taking proactive measures today can save you from headaches tomorrow.

Uncategorised

What Happens After Flooding in Toronto

Experiencing flooding in Toronto can be a traumatic event for homeowners and businesses alike. The aftermath of such an incident often leaves individuals feeling overwhelmed and unsure of how to proceed. In Toronto, heavy rains and sudden storms can cause serious water damage. Knowing what to do after flooding is important for effective recovery. If you have a flooded basement, like many in Toronto, this article will help you. It covers important steps to take, the flood restoration process in Toronto, and ways to prevent future problems. Understanding the Causes of Flooding Flooding can occur because of various factors, and recognizing these causes is the first step in prevention and recovery. Common Causes of Flooding Recognizing Vulnerable Areas Certain areas of a property are more susceptible to flooding. Homeowners should pay attention to: Immediate Actions to Take After a Flood When faced with flooding, swift action is essential to minimize damage and ensure safety. If you’re wondering what to do after flooding Toronto weather has caused, start with these steps: Safety First Document the Damage Engaging Professional Help After ensuring safety and documenting the damage, it’s time to seek professional assistance. Many turn to flood cleanup Toronto experts at this stage. Choosing a Restoration Company The Restoration Process Health and Safety Considerations Floodwaters can pose serious health risks due to contamination. Potential Hazards Protective Measures Insurance Claims and Financial Considerations Navigating insurance claims can be daunting, but it’s a vital step in the recovery process. Understanding Your Policy Documenting Your Claim Repairing and Rebuilding Once the immediate flood cleanup Toronto phase is complete, it’s time to focus on repairs and rebuilding. Assessing Damage Enhancing Resilience Preventative Measures for Future Flooding Taking proactive steps can help reduce the likelihood of future flooding. Landscaping and Drainage Installing Flood Prevention Systems Community Resources and Support In the aftermath of flooding, Toronto flood recovery services and community resources can provide valuable support. Local Assistance Programs CPR24 Restoration Services: As a trusted local provider, CPR24 Restoration offers professional support to Toronto homeowners dealing with flood damage. Our team helps clients navigate the flood recovery process from start to finish—including documentation for insurance claims, emergency water removal, and full-service water damage restoration in Toronto. We work directly with many homeowners who qualify for municipal or insurance-based financial assistance to ensure fast, efficient recovery. Community Support Guidance: If additional help is needed, CPR24 can connect clients with local non-profits and community organizations that offer supplementary resources for flood recovery and rebuilding. We’re here to support you beyond just cleanup—our goal is to restore your property and peace of mind. Building Community Resilience Conclusion Recovering from flooding in Toronto requires a comprehensive approach that encompasses immediate actions, professional assistance, and long-term preventative measures. Homeowners can handle the recovery process well by understanding why flooding happens, acting quickly, and working with experts. Additionally, implementing preventative strategies can help mitigate future risks, ensuring a safer environment for all. Remember, the key to resilience lies in preparation, community support, and informed decision-making. This article gives a clear overview of what to do after flood restoration Toronto. It highlights the need for quick action, professional flood restoration services, and long-term prevention strategies. By following these guidelines, people can manage the effects of flooding. This will help create a safer and stronger future.

Uncategorised

Drywall Replacement After Mold or Water Damage

Water damage can wreak havoc on your home, particularly when it affects drywall. Understanding the implications of water exposure and mold growth is crucial for homeowners. This article will discuss important factors to consider regarding drywall replacement after mold or water damage, including why you need to replace drywall after water damage or mold. We will cover the signs to watch for and the steps for proper restoration. Understanding Water Damage and Its Effects on Drywall Water damage occurs when excess moisture infiltrates your home, often because of leaks, flooding, or high humidity. Drywall, primarily composed of gypsum and paper, is particularly vulnerable to water exposure. When drywall absorbs moisture, it can lead to a series of detrimental effects. That’s why many homeowners ask: Does drywall need to be replaced after water damage? In most cases, replacing drywall after water damage is the best course of action. The Composition of Drywall Drywall consists of a gypsum core sandwiched between two sheets of heavy paper. This structure makes it lightweight and easy to install, but it also means that it can absorb water quickly. Once wet, the paper can deteriorate, and the gypsum can crumble, leading to a loss of structural integrity. If you are asking when to replace drywall after water damage, it depends on two things. First, how long has it been wet? Second, how severe is the damage? Signs of Water Damage Identifying water damage early can save you from extensive repairs. Look for the following indicators: These symptoms are strong indicators for drywall water damage repair or drywall mold damage repair. The Risks of Ignoring Water Damage Failing to address water damage can lead to severe consequences, including: When to Replace Drywall After Water Damage Determining whether to repair or replace drywall after water damage is critical. Several factors influence this decision. Extent of Damage Assess the severity of the damage. If someone soaks the drywall for more than 48 hours, they often find it beyond repair. The longer it remains wet, the more likely it is to harbour mold and structural issues. Replacing water damaged drywall is safer and prevents future issues. Type of Water Involved The source of the water is also a significant factor. Clean water from a broken pipe can help with drying and repairs. However, contaminated water from flooding or sewage backups usually requires replacing water-damaged drywall because of health risks. Mold Presence If mold has developed, it is usually safer to replace the affected drywall. Mold can spread quickly and may require extensive remediation efforts. In this case, replacing drywall after mold removal is essential. Structural Integrity If the drywall has become soft, warped, or crumbled, it indicates significant structural damage. In these cases, replacing drywall after mold or water damage is the best choice. This keeps your home safe and stable. The Drywall Replacement Process If you determine that replacement is necessary, follow these steps to ensure a thorough and effective process. Step 1: Assess the Damage Before beginning the replacement, conduct a thorough assessment of the affected area. Check how much damage there is. See if any hidden parts, like insulation or framing, need fixing too. This helps determine the cost to replace water damaged drywall. Step 2: Remove the Damaged Drywall Using a utility knife or drywall saw, carefully cut out the damaged sections. Make sure to remove at least 12 inches beyond the area that looks affected. This will help ensure that we remove all damaged material. This applies to both wall and replace ceiling drywall water damage scenarios. Step 3: Inspect for Mold After removing the damaged drywall, inspect the area for mold growth. If mold is present, you must remediate it according to safety guidelines. In severe cases, consider hiring a professional mold remediation service. Step 4: Prepare the Area for New Drywall Once the damaged material is removed, prepare the area for new drywall installation. Ensure that the framing is intact and free from moisture. If necessary, replace any damaged insulation or framing components. Step 5: Install New Drywall Cut new drywall to fit the opening and secure it to the framing using drywall screws. Ensure that you sink the screws slightly below the surface of the drywall. Step 6: Tape and Mud the Joints As part of the drywall replacement after mold or water damage, apply drywall tape over the seams and cover it with joint compound. Spread the compound over the tape, and blend the edges to make a smooth transition between the new and old drywall. Step 7: Sand and Finish Once the joint compound is dry, sand the area to create a smooth surface. Apply a primer and paint to match the surrounding wall. This step finalizes the drywall repair after flood or mold restoration process. Preventing Future Water Damage Taking proactive measures can help prevent future water damage and the need for drywall replacement after water damage. Regular Inspections Conduct regular inspections of your home, particularly in areas prone to moisture, such as basements, attics, and bathrooms. Look for signs of leaks or water intrusion. Maintain Gutters and Downspouts Ensure that gutters and downspouts are clear of debris and functioning properly. This helps direct water away from your home’s foundation and reduces the risk of water infiltration. Address Plumbing Issues Promptly If you notice any plumbing leaks, address them immediately. Even small leaks can lead to significant water damage over time. Control Indoor Humidity Use dehumidifiers in areas with high humidity to prevent moisture buildup. Keeping indoor humidity levels below 60% can help inhibit mold growth. The Importance of Professional Help DIY repairs can be tempting. However, it is usually better to hire professionals for drywall mold damage repair and water-damaged drywall replacement. Expertise and Experience Professionals have the knowledge and experience to assess the damage accurately and determine the best course of action. They can identify hidden issues that may not be immediately apparent. Proper Equipment Restoration professionals use specialized equipment to effectively remove moisture and prevent

Uncategorised

How Long Does Mold Removal Take?

Mold can be a significant concern for homeowners and businesses alike. Not only does it pose health risks, but it can also lead to structural damage if not addressed promptly. But how long does mold removal take when you decide to tackle this issue? Understanding the mold remediation timeline is essential for anyone facing this issue. This article will look at the factors that affect how long mold removal takes. It will also explain the mold removal process and what to expect during cleanup. Understanding Mold Remediation Mold remediation refers to the comprehensive process of identifying, containing, and eliminating mold from an indoor environment. This mold remediation process explained goes beyond mere removal; it also involves addressing the underlying causes of mold growth, such as moisture and humidity levels. Effective remediation ensures that mold does not return, creating a healthier living or working environment. Importance of Mold Remediation Mold can create allergens and irritants. These can cause health problems, especially for people with breathing issues or weak immune systems. Additionally, mold can damage building materials, leading to costly repairs. Therefore, timely and effective mold remediation is crucial for maintaining both health and property integrity. Factors Influencing Mold Removal Duration The time it takes to complete mold remediation can vary widely based on several factors. Knowing these factors can help set realistic expectations for the process. It can also answer the common question: how long does mold remediation take? Severity of the Infestation The extent of the mold problem is one of the primary determinants of how long remediation will take. You can resolve minor mold issues in just a day or two, while extensive infestations can take a week or more to address. If you’re dealing with toxic growth, the black mold removal timeline tends to be on the longer end. Size of the Affected Area The size of the area impacted by mold also plays a significant role in determining the time to remove mold from house interiors. Larger spaces naturally require more time to assess, contain, and treat. Accessibility of the Mold Mold located in hard-to-reach areas, such as behind walls or under floors, can complicate the remediation process. Accessing these areas often requires additional time for inspection and treatment. For example, how long does it take to remove mold from drywall will depend on the material’s saturation and whether removal or drying is needed. Environmental Conditions Humidity and temperature levels can significantly impact mold growth and the effectiveness of remediation efforts. High humidity can slow down drying processes, prolonging the time needed for complete removal. The Mold Remediation Process Understanding the steps in mold remediation can provide insight into how long the process may take. Here’s a simple breakdown of the usual stages. Experts trained in mold removal and timing often manage these. Initial Assessment The first step in mold remediation is a thorough assessment of the affected areas. Professionals will inspect the property to determine the extent of the mold growth and identify moisture sources. Containment Once the assessment is complete, the next step is to contain the mold to prevent spores from spreading to unaffected areas. This often involves setting up physical barriers and using negative air pressure machines. Mold Removal The actual mold removal process can vary significantly based on the severity of the infestation. This step may involve removing contaminated materials, applying antimicrobial treatments, and addressing moisture sources. Cleaning and Sanitizing After mold removal, the affected areas must be thoroughly cleaned and sanitized to eliminate any remaining spores. This step is crucial for preventing future mold growth. Drying and Dehumidifying Ensuring that the area is completely dry is essential to prevent mold from returning. This often involves using dehumidifiers and air movers to remove excess moisture. Restoration If any materials were damaged during the mold removal process, restoration may be necessary. This can range from minor repairs to extensive renovations. Safety Considerations During Mold Remediation Safety is a paramount concern during mold remediation. Experts usually recommend that people leave the building while workers perform tasks, especially in those areas. Mold spores can become airborne during remediation, posing health risks. Professional vs. DIY Mold Remediation While some homeowners may consider tackling mold removal themselves, professional mold removal time is typically faster and more effective. Preventing Future Mold Growth After remediation, it is crucial to implement measures to prevent mold from returning. This includes maintaining low humidity levels, ensuring proper ventilation, and conducting regular inspections. Understanding the mold remediation timeline is essential for anyone facing a mold issue. Mold removal can take different amounts of time. This depends on how bad the infestation is and the methods used. Getting help from professionals usually leads to a faster and better solution. Homeowners can keep their homes healthy by quickly dealing with mold. They should also take steps to prevent mold from growing again. In summary, mold remediation is a critical process that requires careful planning and execution. By knowing the factors that affect mold removal and cleanup, people can prepare better for the process. This helps ensure a successful outcome.

Uncategorised

How Long Does Water Damage Restoration in Toronto Take?

Water damage can be a distressing experience for homeowners and business owners alike. A burst pipe, a bad storm, or a broken appliance can cause big problems. Many are left wondering how long water damage restoration in Toronto takes. These issues can lead to severe damage and health risks if not fixed quickly. Understanding the timeline for fixing water damage and the water damage restoration timeline is crucial for effective recovery. This article will look at the factors that affect how long restoration takes. It will explain the steps in the water damage restoration process. Property owners will learn what to expect during this difficult time. Understanding Water Damage Water damage occurs when unwanted water infiltrates a property, leading to potential harm to the structure and its contents. This can happen through various means, including: Finding the source of water damage is important. It can affect how we restore the area and how long repairs take. The Importance of Timely Restoration Addressing water damage swiftly is vital for several reasons: Understanding how long it takes to repair water damage can help property owners make better choices. Factors Influencing Restoration Time The duration of professional water damage restoration can vary significantly based on several key factors: 1. Type of Water Involved The category of water involved in the damage plays a crucial role in determining the restoration timeline: Black Water (Category 3): This highly contaminated water comes from sewage or floodwaters. Flood damage restoration time can take a long time. It may take weeks because of safety precautions and thorough cleaning. 2. Extent of Damage The severity of the water damage significantly impacts the restoration timeline. Small damage in one area may take a few days to fix. However, serious damage in many rooms or floors can take weeks or even months to repair. 3. Affected Materials Different materials absorb water at varying rates, influencing drying time for water damage: 4. Response Time The speed at which an emergency water damage restoration company can respond is critical. Immediate action can significantly reduce the extent of damage and the overall restoration timeline. 5. Insurance Processing Delays in the water damage insurance process can also extend the timeline. The insurance company may require approval before you can begin significant restoration work. The Water Damage Restoration Process Understanding the water damage cleanup steps can provide clarity on what to expect and how long does water damage restoration in Toronto take. Step 1: Initial Assessment The water damage restoration process begins with a thorough assessment of the damage. A professional will evaluate the affected areas, identify the source of water, and determine the extent of the damage. This initial inspection typically takes a few hours and may involve: Step 2: Water Extraction Once the assessment is complete, the next step is to remove any standing water. Specialized equipment such as pumps and wet vacuums performs this task. The duration of this step depends on the volume of water present and can take anywhere from a few hours to a day. Step 3: Drying and Dehumidification After water extraction, the affected areas must be thoroughly dried. They set up high-powered fans and dehumidifiers to facilitate the water damage drying process. How long does it take to dry out water damage depends on materials and conditions, but typically ranges from 3 to 7 days. Step 4: Cleaning and disinfection Once the area is dry, cleaning and disinfection are essential to prevent mold growth and eliminate contaminants. This step may involve: Step 5: Repairs and Reconstruction The final step in the professional water damage restoration process is repairing and reconstructing any damaged areas. This may include replacing drywall, flooring, and other structural components. The timeline for this phase can change a lot. It depends on how much damage there is and the availability of materials and workers. Estimated Timelines for Restoration The time to fix water damage can vary a lot. It depends on how bad the problem is. Many homeowners often ask, “How Long Does Water Damage Restoration in Toronto Take?”—and the answer depends on several important factors. For minor damage, such as a small leak affecting one room, restoration typically takes between one to three days. When the damage is moderate, it may affect several rooms or involve more water exposure. This process can take one to two weeks. In cases of major damage, where entire floors or structural components are impacted, homeowners can expect restoration to take around two to four weeks. In extreme cases like severe flooding or black water contamination, the timeline can take four to six weeks or longer. This is especially true if someone needs to perform reconstruction. These estimates can change. The speed of the repair determines their dependence. They also depend on the materials used. Additionally, the speed of your insurance and restoration team’s response matters. Tips for Speeding Up the Restoration Process Some parts of the water damage restoration process are out of your control. However, you can take steps to speed up the restoration timeline. Water damage restoration is a complex process that requires prompt action and professional water damage restoration expertise. Understanding the factors influencing the timeline for fixing water damage can help property owners navigate this challenging situation more effectively. Knowing the answer to “How Long Does Water Damage Restoration in Toronto Take?” can better prepare homeowners to act quickly and make informed decisions. Act quickly, keep in touch, and be ready. This can help make water damage restoration easier and reduce the impact on your property. If you have water damage, contact a qualified restoration company right away. They can help you start your recovery.

Scroll to Top

Water Damage, flooding, or mold issues, our expert team is available 24/7 to restore your property. Contact Us Now!

Call Now