
Drywall Replacement After Mold or Water Damage
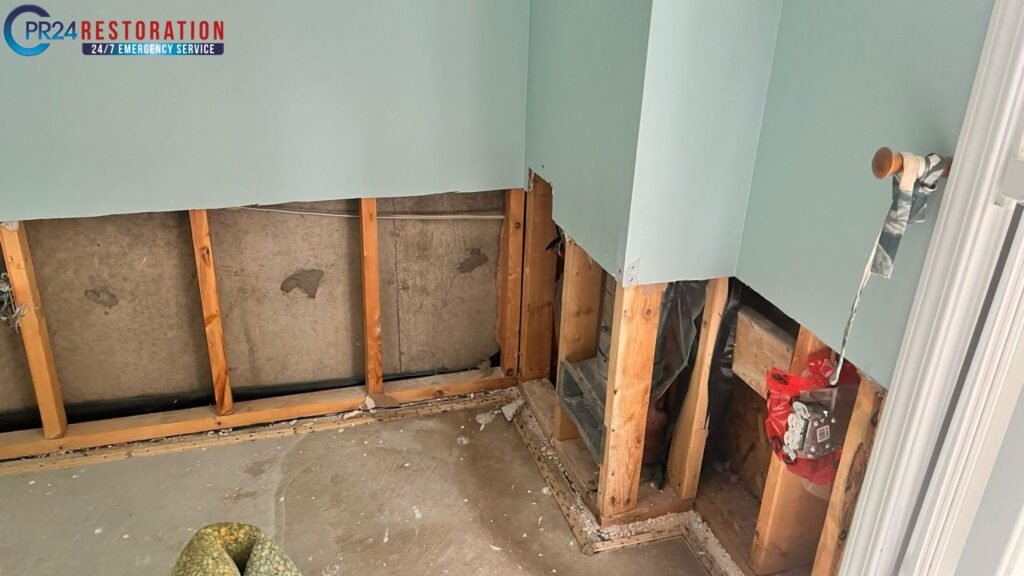
Water damage can wreak havoc on your home, particularly when it affects drywall. Understanding the implications of water exposure and mold growth is crucial for homeowners. This article will discuss important factors to consider regarding drywall replacement after mold or water damage, including why you need to replace drywall after water damage or mold. We will cover the signs to watch for and the steps for proper restoration. Understanding Water Damage and Its Effects on Drywall Water damage occurs when excess moisture infiltrates your home, often because of leaks, flooding, or high humidity. Drywall, primarily composed of gypsum and paper, is particularly vulnerable to water exposure. When drywall absorbs moisture, it can lead to a series of detrimental effects. That’s why many homeowners ask: Does drywall need to be replaced after water damage? In most cases, replacing drywall after water damage is the best course of action. The Composition of Drywall Drywall consists of a gypsum core sandwiched between two sheets of heavy paper. This structure makes it lightweight and easy to install, but it also means that it can absorb water quickly. Once wet, the paper can deteriorate, and the gypsum can crumble, leading to a loss of structural integrity. If you are asking when to replace drywall after water damage, it depends on two things. First, how long has it been wet? Second, how severe is the damage? Signs of Water Damage Identifying water damage early can save you from extensive repairs. Look for the following indicators: These symptoms are strong indicators for drywall water damage repair or drywall mold damage repair. The Risks of Ignoring Water Damage Failing to address water damage can lead to severe consequences, including: When to Replace Drywall After Water Damage Determining whether to repair or replace drywall after water damage is critical. Several factors influence this decision. Extent of Damage Assess the severity of the damage. If someone soaks the drywall for more than 48 hours, they often find it beyond repair. The longer it remains wet, the more likely it is to harbour mold and structural issues. Replacing water damaged drywall is safer and prevents future issues. Type of Water Involved The source of the water is also a significant factor. Clean water from a broken pipe can help with drying and repairs. However, contaminated water from flooding or sewage backups usually requires replacing water-damaged drywall because of health risks. Mold Presence If mold has developed, it is usually safer to replace the affected drywall. Mold can spread quickly and may require extensive remediation efforts. In this case, replacing drywall after mold removal is essential. Structural Integrity If the drywall has become soft, warped, or crumbled, it indicates significant structural damage. In these cases, replacing drywall after mold or water damage is the best choice. This keeps your home safe and stable. The Drywall Replacement Process If you determine that replacement is necessary, follow these steps to ensure a thorough and effective process. Step 1: Assess the Damage Before beginning the replacement, conduct a thorough assessment of the affected area. Check how much damage there is. See if any hidden parts, like insulation or framing, need fixing too. This helps determine the cost to replace water damaged drywall. Step 2: Remove the Damaged Drywall Using a utility knife or drywall saw, carefully cut out the damaged sections. Make sure to remove at least 12 inches beyond the area that looks affected. This will help ensure that we remove all damaged material. This applies to both wall and replace ceiling drywall water damage scenarios. Step 3: Inspect for Mold After removing the damaged drywall, inspect the area for mold growth. If mold is present, you must remediate it according to safety guidelines. In severe cases, consider hiring a professional mold remediation service. Step 4: Prepare the Area for New Drywall Once the damaged material is removed, prepare the area for new drywall installation. Ensure that the framing is intact and free from moisture. If necessary, replace any damaged insulation or framing components. Step 5: Install New Drywall Cut new drywall to fit the opening and secure it to the framing using drywall screws. Ensure that you sink the screws slightly below the surface of the drywall. Step 6: Tape and Mud the Joints As part of the drywall replacement after mold or water damage, apply drywall tape over the seams and cover it with joint compound. Spread the compound over the tape, and blend the edges to make a smooth transition between the new and old drywall. Step 7: Sand and Finish Once the joint compound is dry, sand the area to create a smooth surface. Apply a primer and paint to match the surrounding wall. This step finalizes the drywall repair after flood or mold restoration process. Preventing Future Water Damage Taking proactive measures can help prevent future water damage and the need for drywall replacement after water damage. Regular Inspections Conduct regular inspections of your home, particularly in areas prone to moisture, such as basements, attics, and bathrooms. Look for signs of leaks or water intrusion. Maintain Gutters and Downspouts Ensure that gutters and downspouts are clear of debris and functioning properly. This helps direct water away from your home’s foundation and reduces the risk of water infiltration. Address Plumbing Issues Promptly If you notice any plumbing leaks, address them immediately. Even small leaks can lead to significant water damage over time. Control Indoor Humidity Use dehumidifiers in areas with high humidity to prevent moisture buildup. Keeping indoor humidity levels below 60% can help inhibit mold growth. The Importance of Professional Help DIY repairs can be tempting. However, it is usually better to hire professionals for drywall mold damage repair and water-damaged drywall replacement. Expertise and Experience Professionals have the knowledge and experience to assess the damage accurately and determine the best course of action. They can identify hidden issues that may not be immediately apparent. Proper Equipment Restoration professionals use specialized equipment to effectively remove moisture and prevent